
Transfer (Installment Item)
Home / Documentation /
⚙️ Getting Started
🏪 Outlet
⚙️ Settings
🏧 Working With Counter
💰 Working Denomination
🛒 Make a Test Sale
👥 Employee Management
📅 Attendance
📋 Working with Tax
🏦 Account
📦 Working (General Item)
📦 Working (Variation Item)
📱 Working (IMEI Item)
🏷️ Working (Serial Item)
💊 Working (Medicine Item)
💳 Working (Installment Item)
🔧 Working (Service Item)
📊 Stock (General Item)
📊 Stock (Variation Item)
📊 Stock (IMEI Item)
📊 Stock (Serial Item)
📊 Stock (Medicine Item)
📊 Stock (Installment Item)
📥 Purchase (General Item)
📥 Purchase (Variation Item)
📥 Purchase (IMEI Item)
📥 Purchase (Serial Item)
📥 Purchase (Medicine Item)
📥 Purchase (Installment Item)
🏷️ Barcode & Label
🖨️ Working with Printer
🛒 Sale (General Item)
🛒 Sale (Variation Item)
🛒 Sale (IMEI Item)
🛒 Sale (Serial Item)
🛒 Sale (Medicine Item)
🛒 Sale (Installment Item)
🔧 Sale (Service Item)
🌐 Multivendor e-Commerce
📧 Working with Email
💬 Working with SMS
💳 Payment Gateway Setting
💬 Working with WhatsApp
👤 Working with Customer
🏢 Working with Supplier
📤 Purchase Return (General Item)
📤 Purchase Return (Variation Item)
📤 Purchase Return (IMEI Item)
📤 Purchase Return (Serial Item)
📤 Purchase Return (Medicine Item)
📤 Purchase Return (Installment Item)
🔄 Sale Return (General Item)
🔄 Sale Return (Variation Item)
🔄 Sale Return (IMEI Item)
🔄 Sale Return (Serial Item)
🔄 Sale Return (Medicine Item)
🔄 Sale Return (Installment Item)
📊 Dashboard
🎁 Promotion & Coupon
🏆 Loyalty
💳 Installment Sale
🔧 Warranty/Servicing
📈 Income
📉 Expense
💰 Salary/Payroll
📋 Quotation
🔄 Transfer (General Item)
🔄 Transfer (Variation Item)
🔄 Transfer (IMEI Item)
🔄 Transfer (Serial Item)
🔄 Transfer (Medicine Item)
🔄 Transfer (Installment Item)
❌ Damage (General Item)
❌ Damage (Variation Item)
❌ Damage (IMEI Item)
❌ Damage (Serial Item)
❌ Damage (Medicine Item)
❌ Damage (Installment Item)
🏢 Fixed Asset
📊 Report
🔄 Update Software
❌ Uninstall License
Transfer refers to the process of moving inventory/stock from one outlet or location to another within the same business or organization. This functionality is particularly useful for businesses with multiple physical locations, where there is a need to redistribute stock between stores to maintain optimal stock levels and meet customer demand.
Add Transfer
The Transfer option for installment products allows you to move items from one outlet to another. This ensures accurate tracking of product movement, maintains proper stock levels, and keeps outlet records updated.
Go to the left sidebar and expand the Transfers menu.
Click on the Add Transfer option.
Select the Installment Product you want to transfer.
Enter the required details such as source and destination outlet.
Save the entry to successfully record the transfer.

The Source Outlet selection ensures that the system knows from which outlet the product is being sent. Choosing the correct outlet is important for accurate stock management and proper transfer tracking.
Open the Add Transfer form.
Locate the field for Source Outlet.
Select the outlet from which you want to send the product.
Verify that the selected outlet has sufficient stock.
Continue filling the rest of the transfer details.
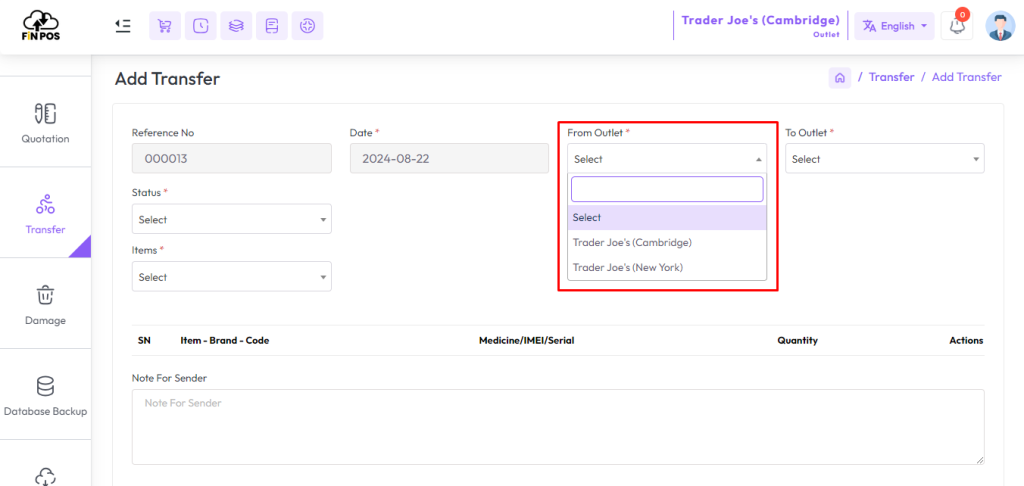
The Destination Outlet selection ensures that the system records where the product is being sent. Choosing the correct outlet is important for accurate inventory updates and proper stock transfer between locations.
Open the Add Transfer form.
Locate the field for Destination Outlet.
Select the outlet you want to send the product to.
Verify that the destination outlet is correct.
Continue filling in the remaining transfer details.
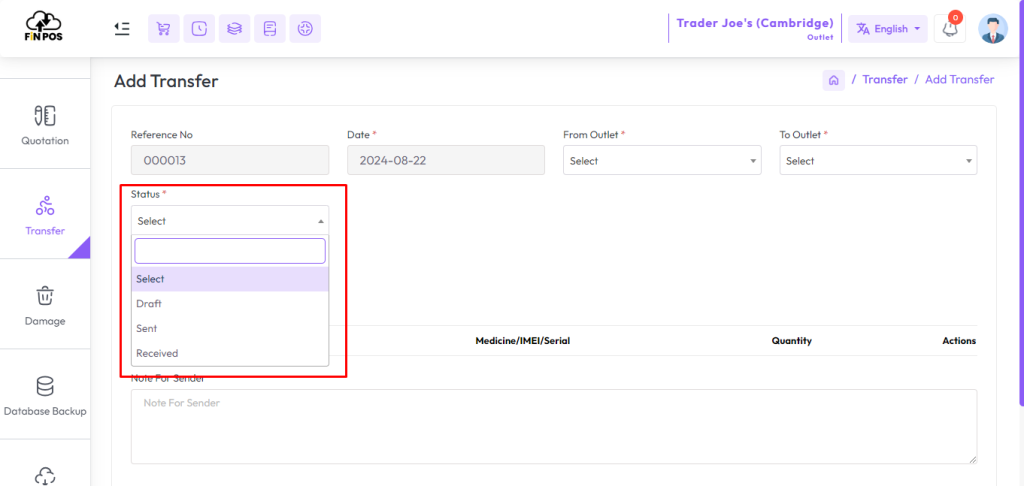
Send products shipping status.
From the Sender Outlet the status can only select Draft and Send.
If the status “Draft” that means the product will not be reduced from the stock, the product will not go to another outlet.
If the status “Send” that means the quantity of the product will not be reduced from the stock, but it will be sent to another outlet. When it is received from other outlet i.e. received status will be reduced from stock and added to other outlet’s stock.
If the status “Received” that means the product will be reduced from the stock, the product will received by another outlet.
Select a product of “Installment Type” from the Item field that you want to transfer.
This ensures installment products are handled separately from regular items.
By choosing the correct product, the transfer process remains accurate and smooth.
Go to the Item field in the transfer form.
Select a product of “Installment Type”.
Confirm the correct product before transferring.

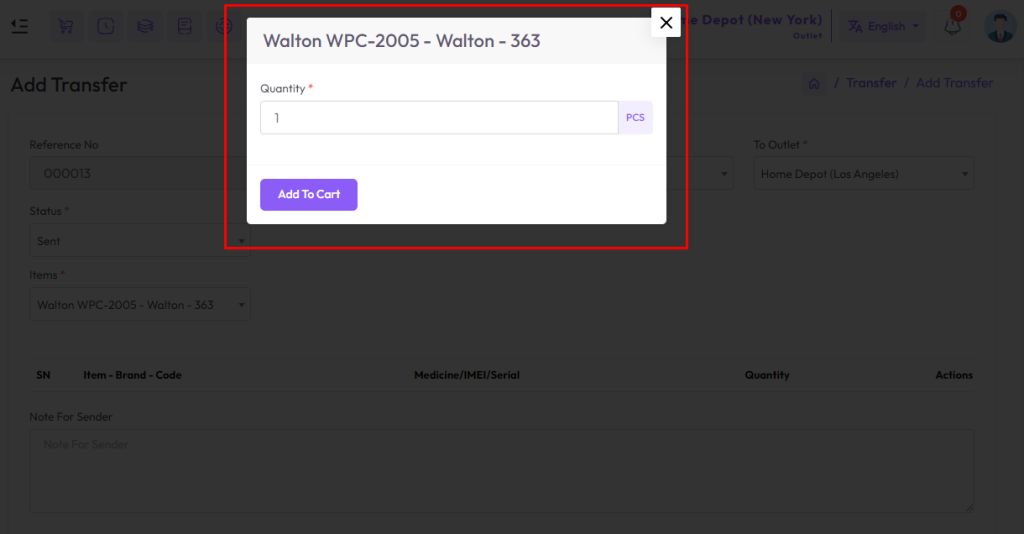
After selecting a installment item you will get a popup modal, Enter the quantity in the Quantity field for how many quantities you want to transfer, Then click the Add to Cart button to add this item to the cart.
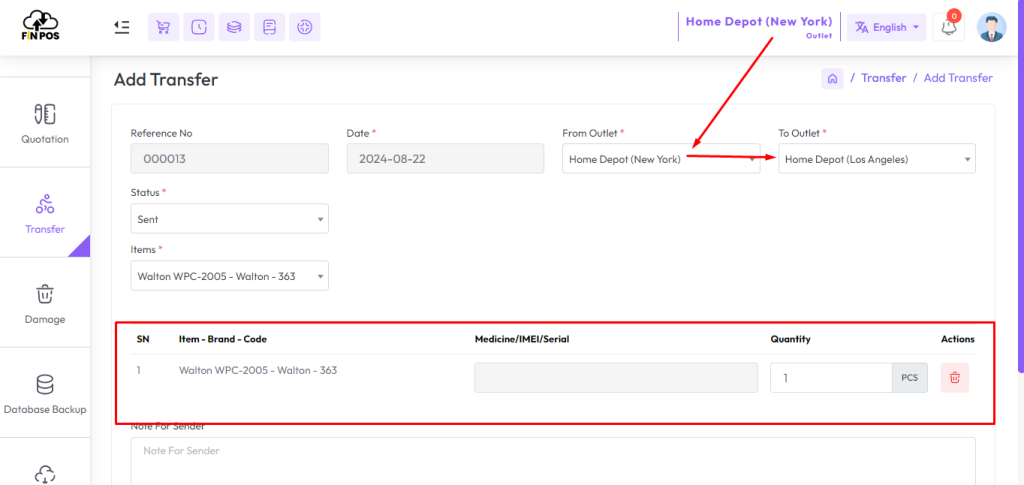
After adding the products to the cart, it will display the items selected for transfer.
The snapshot shows products from the Uttara outlet being sent to the Mirpur outlet.
Finally, fill in the required fields and click on the Submit button to complete the process.
Add the products to the cart.
Check the cart showing transfer from Uttara outlet to Mirpur outlet.
Fill up the required fields.
Hit the Submit button to finish the transfer.
After going to the destination outlet, an alert will appear with transfer details. Here you can confirm and receive the products into your outlet. By selecting the Receive status, the transfer will be completed successfully.
Go to the destination outlet.
Check the alert message with transfer details.
Add the products to your outlet by selecting Receive status.
