Working With Customer
Home / Documentation /
⚙️ Getting Started
🏪 Outlet
⚙️ Settings
🏧 Working With Counter
💰 Working Denomination
🛒 Make a Test Sale
👥 Employee Management
📅 Attendance
📋 Working with Tax
🏦 Account
📦 Working (General Item)
📦 Working (Variation Item)
📱 Working (IMEI Item)
🏷️ Working (Serial Item)
💊 Working (Medicine Item)
💳 Working (Installment Item)
🔧 Working (Service Item)
📊 Stock (General Item)
📊 Stock (Variation Item)
📊 Stock (IMEI Item)
📊 Stock (Serial Item)
📊 Stock (Medicine Item)
📊 Stock (Installment Item)
📥 Purchase (General Item)
📥 Purchase (Variation Item)
📥 Purchase (IMEI Item)
📥 Purchase (Serial Item)
📥 Purchase (Medicine Item)
📥 Purchase (Installment Item)
🏷️ Barcode & Label
🖨️ Working with Printer
🛒 Sale (General Item)
🛒 Sale (Variation Item)
🛒 Sale (IMEI Item)
🛒 Sale (Serial Item)
🛒 Sale (Medicine Item)
🛒 Sale (Installment Item)
🔧 Sale (Service Item)
🌐 Multivendor e-Commerce
📧 Working with Email
💬 Working with SMS
💳 Payment Gateway Setting
💬 Working with WhatsApp
👤 Working with Customer
🏢 Working with Supplier
📤 Purchase Return (General Item)
📤 Purchase Return (Variation Item)
📤 Purchase Return (IMEI Item)
📤 Purchase Return (Serial Item)
📤 Purchase Return (Medicine Item)
📤 Purchase Return (Installment Item)
🔄 Sale Return (General Item)
🔄 Sale Return (Variation Item)
🔄 Sale Return (IMEI Item)
🔄 Sale Return (Serial Item)
🔄 Sale Return (Medicine Item)
🔄 Sale Return (Installment Item)
📊 Dashboard
🎁 Promotion & Coupon
🏆 Loyalty
💳 Installment Sale
🔧 Warranty/Servicing
📈 Income
📉 Expense
💰 Salary/Payroll
📋 Quotation
🔄 Transfer (General Item)
🔄 Transfer (Variation Item)
🔄 Transfer (IMEI Item)
🔄 Transfer (Serial Item)
🔄 Transfer (Medicine Item)
🔄 Transfer (Installment Item)
❌ Damage (General Item)
❌ Damage (Variation Item)
❌ Damage (IMEI Item)
❌ Damage (Serial Item)
❌ Damage (Medicine Item)
❌ Damage (Installment Item)
🏢 Fixed Asset
📊 Report
🔄 Update Software
❌ Uninstall License
Add Customer Group
To add a new Customer Group, first expand the Sale Menu from the left sidebar. Then click on the Add Customer Group option. A form will appear where you need to fill in the required details. Finally, save the record to create the new Customer Group.
Expand the Sale Menu from the left sidebar
Click on Add Customer Group
Fill in the required details in the form
Click Save to create the new Customer Group
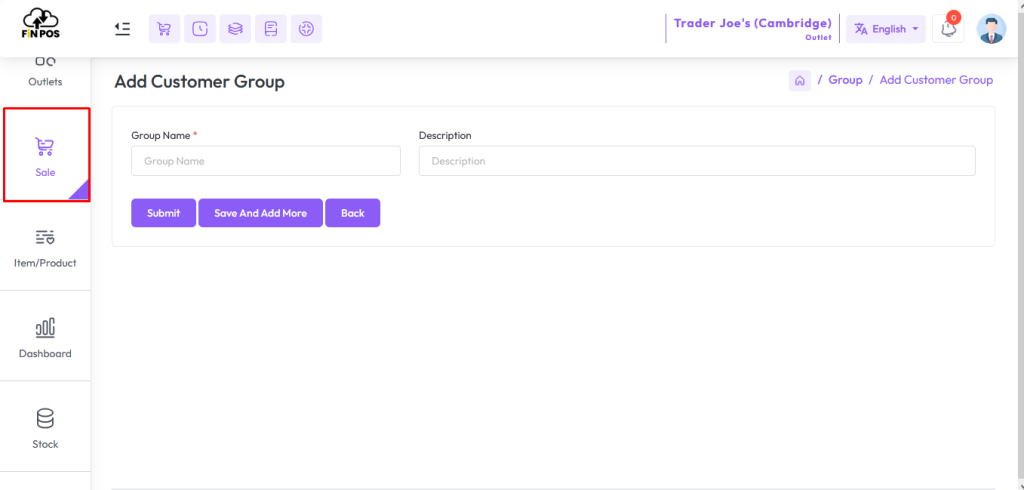
To complete the process, you need to fill up all the required fields in the form carefully. Once the details are entered, review the information to avoid mistakes. After confirming everything, hit the Submit button. This will successfully save your record.
Fill up all the required fields in the form
Review the entered details before submission
Click on the Submit button
Record will be saved successfully
Add Customer
To add a new Customer, first expand the Sale Menu from the left sidebar. Then click on the Add Customer option. A form will appear where you can enter all the customer details. Finally, save the record to successfully add the new customer.
Expand the Sale Menu from the left sidebar
Click on Add Customer
Enter all required customer details in the form
Click Save to add the new customer
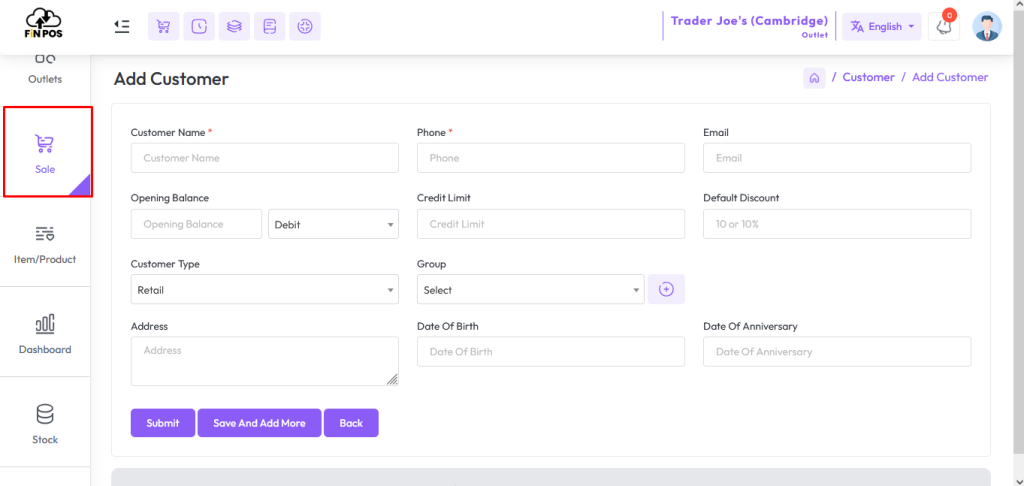
Fill up the required field and hit the submit button.
Opening Balance
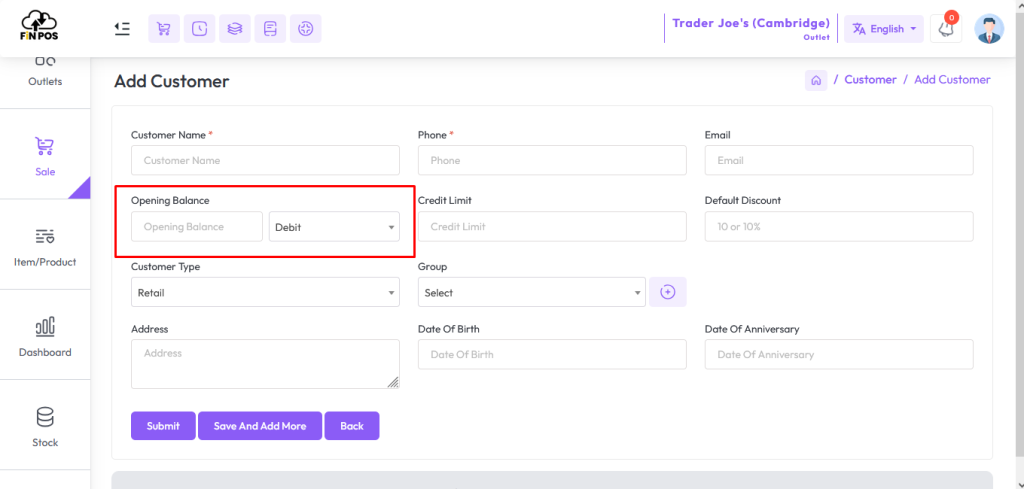
The opening balance for a customer typically refers to any outstanding amount that the customer owes before starting to use the POS system for transactions.
Enter the opening balance in the Opening Balance field. Select Debit if the customer has past dues.
Enter the opening balance in the Opening Balance field. Select Credit if the customer has received money in the past.
Credit Limit
A credit limit is an amount, It determines how much money due a customer can keep.
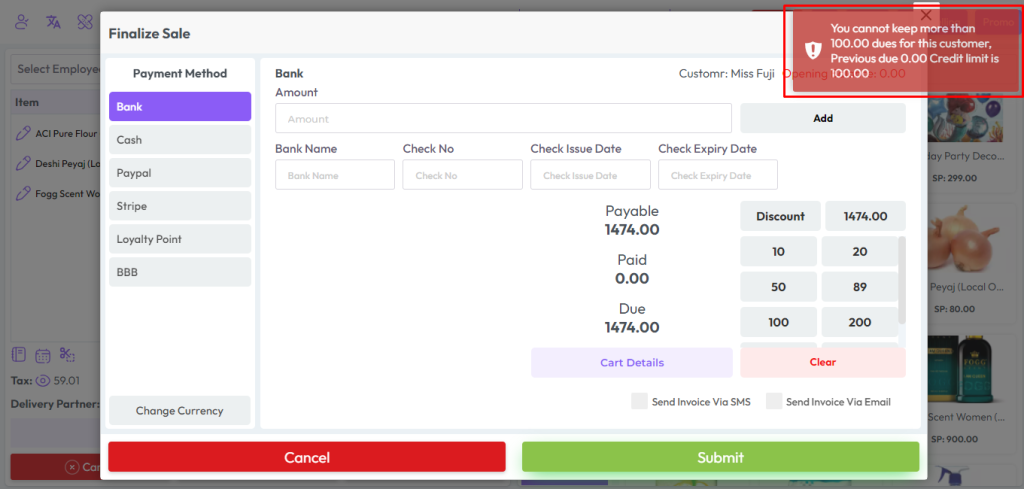
Suppose I give a credit limit of 100 for a customer. This means that the customer cannot owe more than 100 money while selling the product to that customer.

In the credit limit example snapshot, a notification will appear if the dues exceed the set limit. The system checks the customer’s allowed credit before saving the transaction. If the dues are higher than the credit limit, a warning is shown. For example, the message will inform you that the maximum allowed credit is 100.0.
A notification appears if dues exceed the set credit limit
The system verifies customer credit before saving
If dues are higher, a warning is displayed
Example: “You cannot keep more than 100.0 dues for this customer, Because credit limit is 100.0”
Default Discount
While adding a new customer, you can enter a value in the Default Discount field. This discount will automatically apply to every product purchased by that customer. It saves time by avoiding manual entry for each order. The set discount will remain valid for all future sales to that customer.
Enter a value in the Default Discount field while adding a customer
The discount will apply automatically on each product
Saves time by avoiding manual discount entry
Discount remains valid for all future sales of that customer
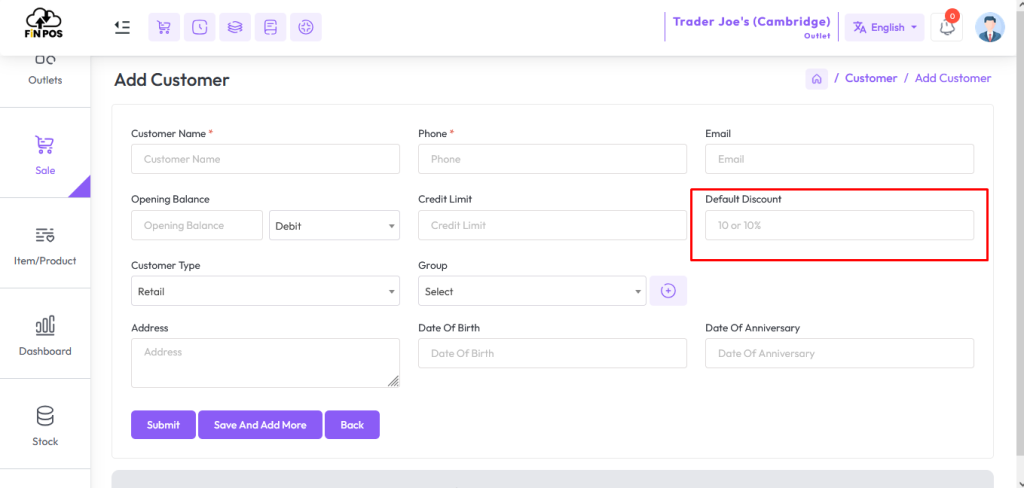
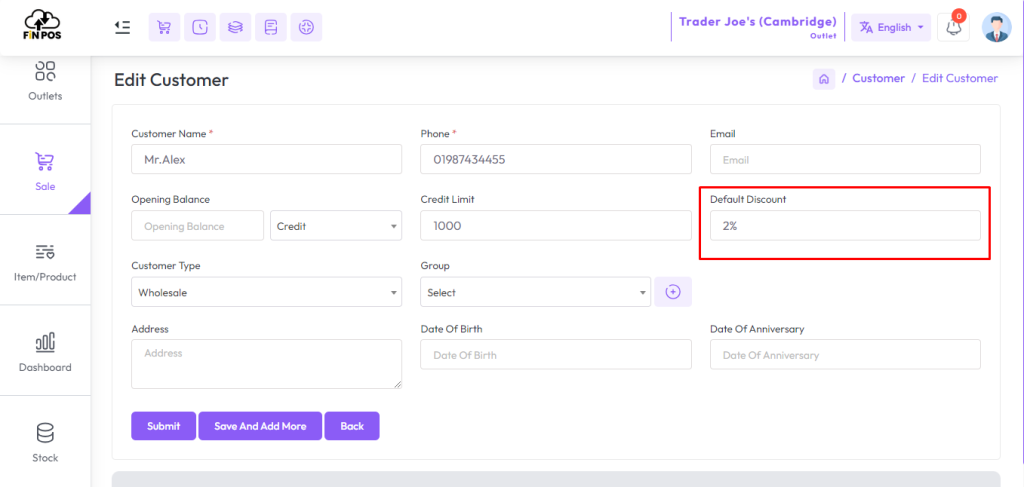
In the snapshot below, you can see that a 2% discount has been applied to the customer Mr. Alex. This discount was set in the Default Discount field while adding the customer. As a result, every product purchased by Mr. Alex will include this discount. This ensures consistency and automatic calculation of discounts for the customer.
Snapshot shows 2% discount applied to Mr. Alex
Discount is set through the Default Discount field
Every product purchased will include this discount
Ensures automatic and consistent discount for the customer
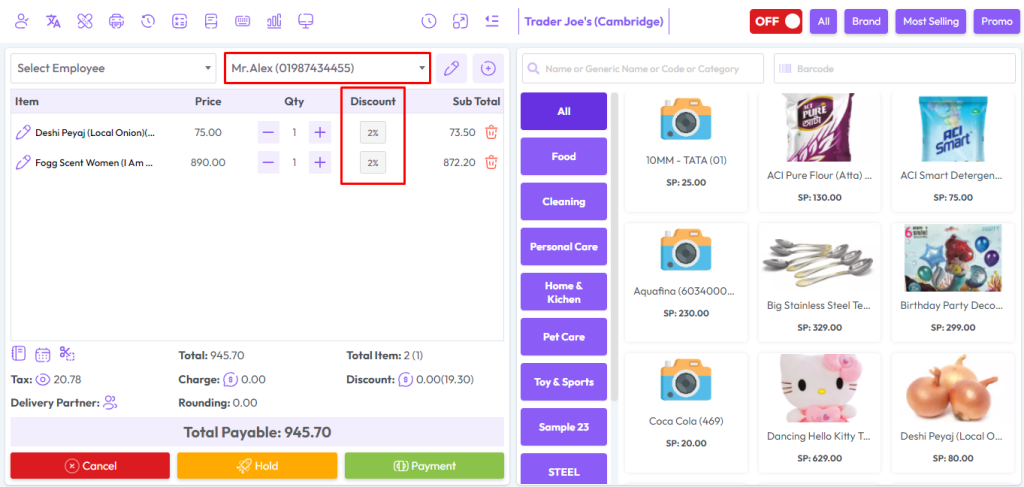
In the snapshot below, the POS screen displays that the customer is receiving a 2% discount on each product. This discount is applied automatically because it was set in the customer’s Default Discount field. The system ensures the discount is calculated on every product without manual entry. This makes the billing process faster and error-free.
POS screen shows a 2% discount applied on each product
Discount is taken from the customer’s Default Discount setting
Applied automatically on all products during billing
Makes the process faster and prevents manual errors
Price Type
While adding customer you’ve see the “Customer Type” field two option one is Retail another is Wholesale, when you select “Retail” option, it means that customer will get “Retails” price while selling. When you select “Wholesale” option then customer will get “Wholesale” price while selling.

In the snapshot below, you can see that the Retail price has been set for the customer Mr. Alex. This means all sales for this customer will follow the retail pricing structure. It helps in maintaining consistent pricing across his purchases. The system will automatically apply the retail price whenever a transaction is made for Mr. Alex.
Snapshot shows Retail price set for Mr. Alex
All sales will follow the retail pricing structure
Ensures consistency in product pricing
Retail price applies automatically in future transactions
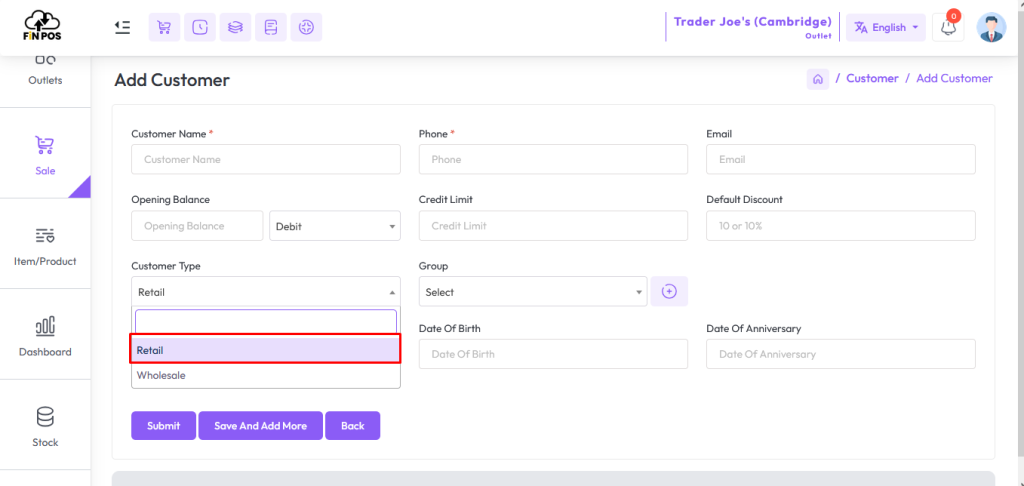
In the snapshot below, you can see that the product “Fogg Scent” has been assigned a Retail price of 900. This price will be applied whenever the product is sold under the retail pricing type. It ensures accurate billing according to the set retail price. The system automatically fetches this price during sales transactions.
Snapshot shows Fogg Scent product with Retail price 900
Retail price is applied during sales under retail pricing type
Ensures accurate and consistent billing
Price is automatically fetched in transactions

You can see in the below snapshot POS screen that the price of the “Fogg Scent” product is 900 if it is to be sold to Mr.Alex.

In the snapshot below, you can see that the Wholesale price has been set for the customer Mr. Alex. This means all sales to this customer will follow the wholesale pricing structure. It helps in offering discounted rates compared to retail pricing. The system will automatically apply the wholesale price whenever Mr. Alex makes a purchase.
Snapshot shows Wholesale price set for Mr. Alex
All sales will follow the wholesale pricing structure
Offers discounted rates compared to retail pricing
Wholesale price applies automatically in future transactions

In the snapshot below you can see that “Fogg Scent” product “Wholesale” price 890.

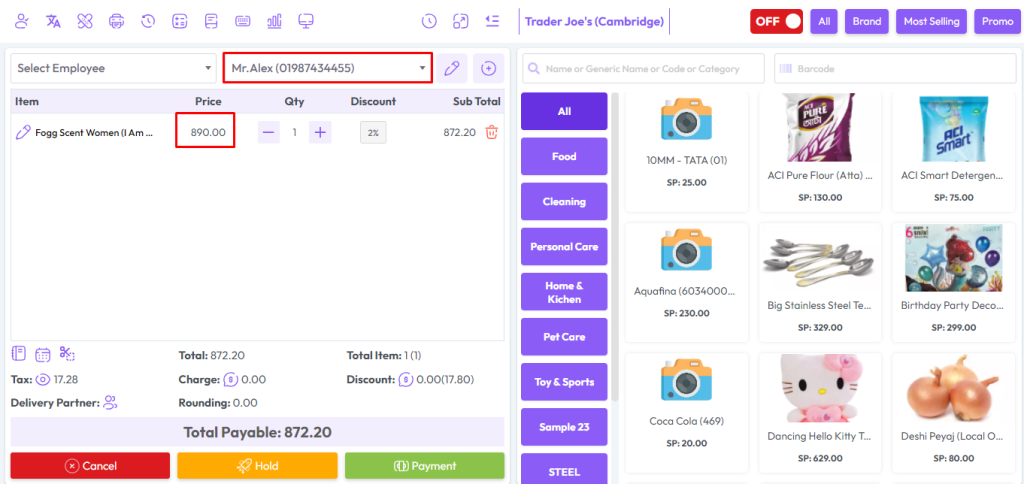
In the snapshot below, the POS screen shows that the product “Fogg Scent” is priced at 890 when sold to the customer Mr. Alex. This price is applied based on the pricing type set for him. The system ensures that the correct price is automatically picked during the sale. This avoids manual adjustments and keeps billing accurate.
POS screen shows Fogg Scent price as 890 for Mr. Alex
Price is applied according to his assigned pricing type
System automatically fetches the correct price at sale time
Ensures accurate and consistent billing without manual changes
List Customer
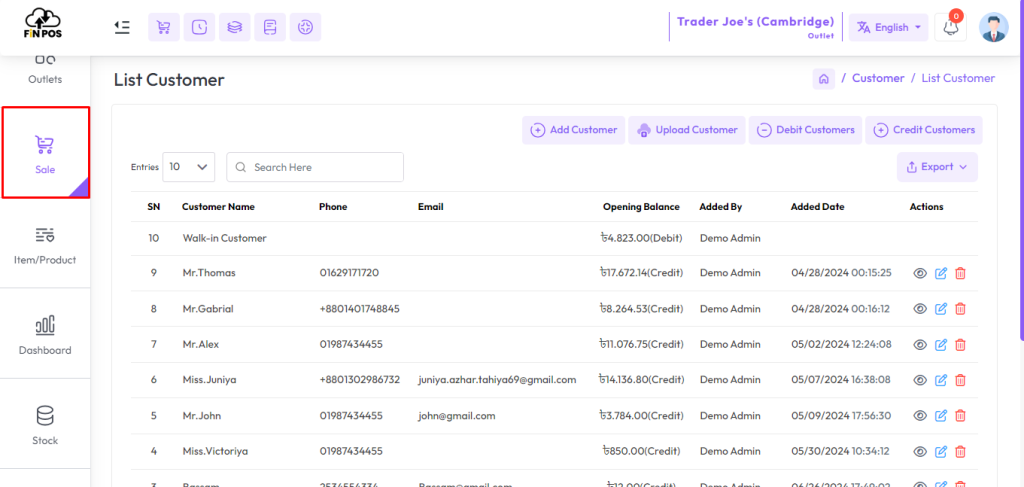
To view the list of customers, first expand the Sale Menu from the left sidebar. Then click on the List Customer option. A page will open showing all the customers added to the system. From here, you can view, search, or manage customer records easily.
Expand the Sale Menu from the left sidebar
Click on List Customer option
A page will display all added customers
View, search, and manage customer records
Debit Customer
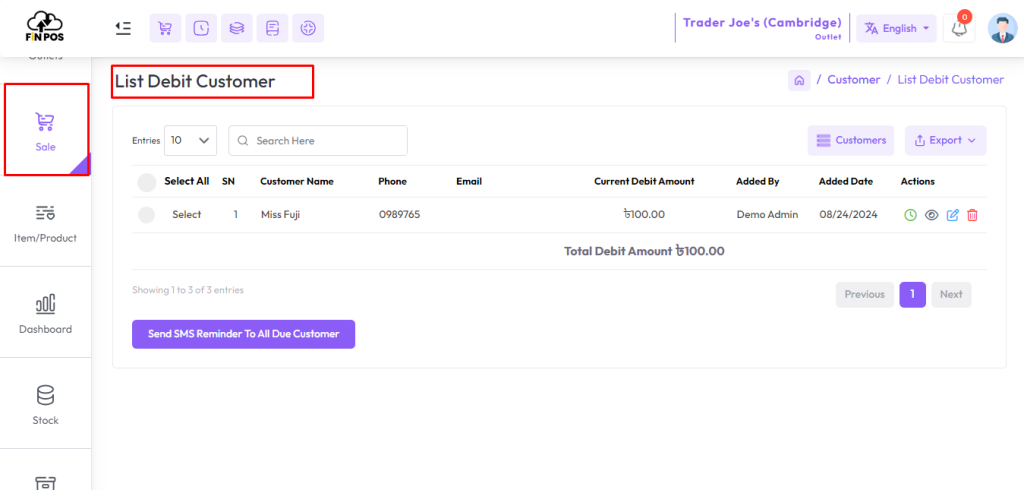
To view Debit Customer Expand Sale Menu form the left sidebar, After clicking on List Customer you will see a button on the right called Debit Customer, click on it.
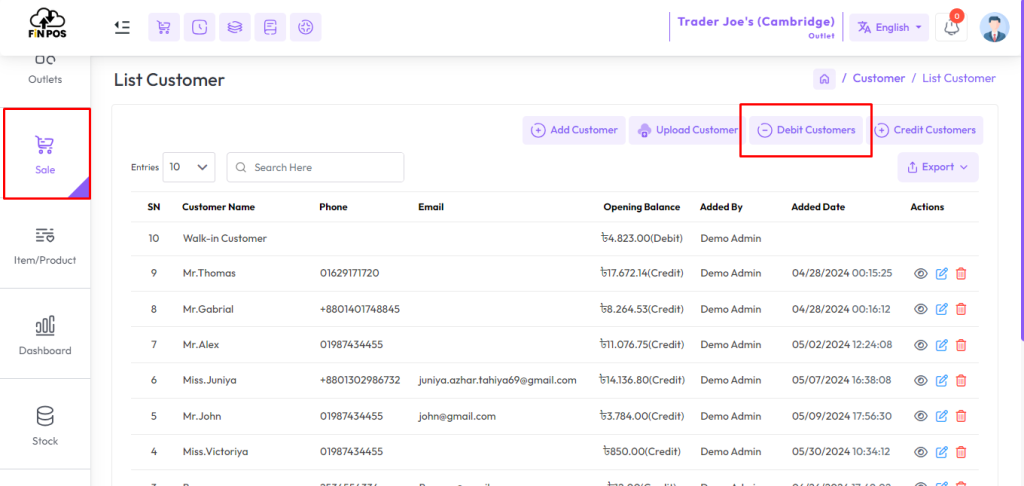
After clicking on the Debit Customer option, a list of all debit customers will be displayed. This list shows customers who have outstanding balances or dues. You can review their pending amounts directly from this screen. The snapshot below provides an example of how the list appears.
Click on the Debit Customer option
A list of debit customers will be displayed
View customers with outstanding balances or dues
Snapshot shows an example of the debit customer list
Credit Customer
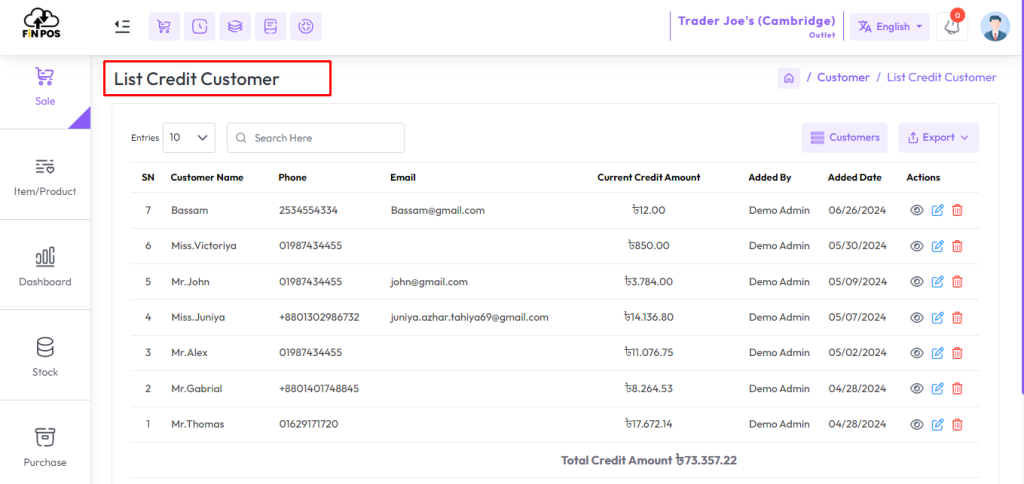
To view Credit Customer Expand Sale Menu form the left sidebar, After clicking on List Customer you will see a button on the right called Credit Customer, click on it

After clicking on the Credit Customer option, a list of all credit customers will be displayed. This list shows customers who have available credit limits or balances in their favor. You can review their credit details directly from this screen. The snapshot below provides an example of how the credit customer list appears.
Click on the Credit Customer option
A list of credit customers will be displayed
View customers with available credit balances
Snapshot shows an example of the credit customer list
Bulk Customer Upload
To Customer Bulk Upload Expand Sale Menu from the left sidebar, Click on the List Customer menu, and Click on “Upload Customer” button.
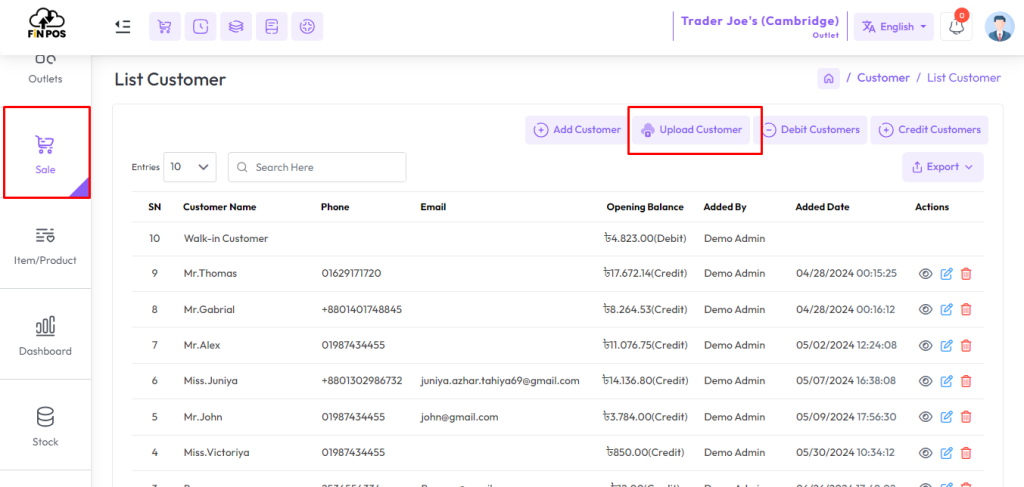
To get started with bulk upload, you first need to download a sample Excel file. This file provides the exact format required for entering data. By following the given structure, you can avoid mistakes during upload. Simply click the Download Sample button to download the file.
Click on the Download Sample button
A sample Excel file will be downloaded
File contains the required format for data entry
Helps avoid errors during bulk upload

Check “Remove all previous data, before uploading new data” to delete all previous customers while uploading new customers.
Leave it unchecked if you don’t want to delete previous customers.

Read the excel file guidelines carefully.
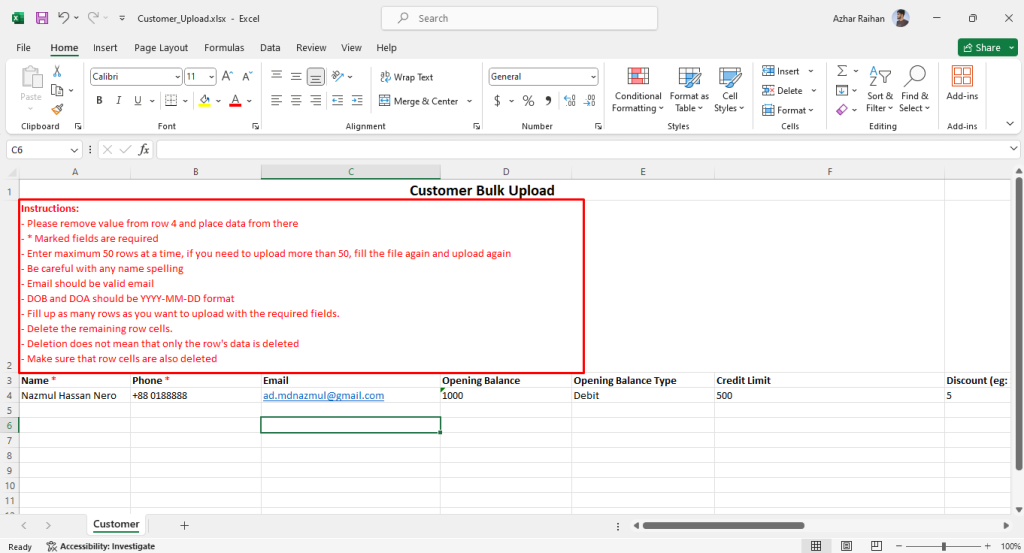
After preparing the Excel file with all required data, the next step is to upload it into the system. Make sure the file follows the correct format to avoid errors. Use the upload option provided on the screen to select your file. Once uploaded, the system will process the data automatically.
Prepare the Excel file with required data
Ensure the file is in the correct format
Click on the Upload option and select your file
System will process the uploaded data automatically
Send SMS to All Due Customer
To send message to all debit customers go to debit customer list, select customers and click “Send SMS Reminder To All Due Customer” button.
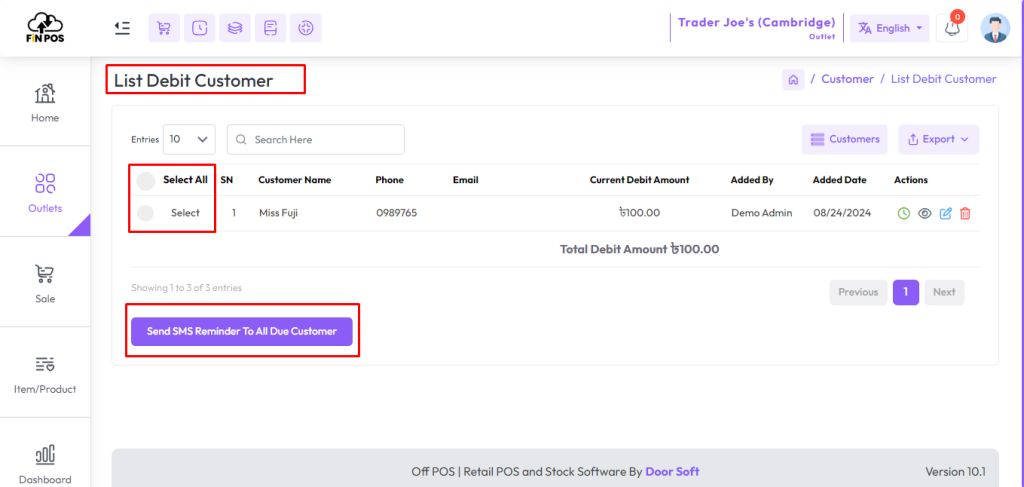
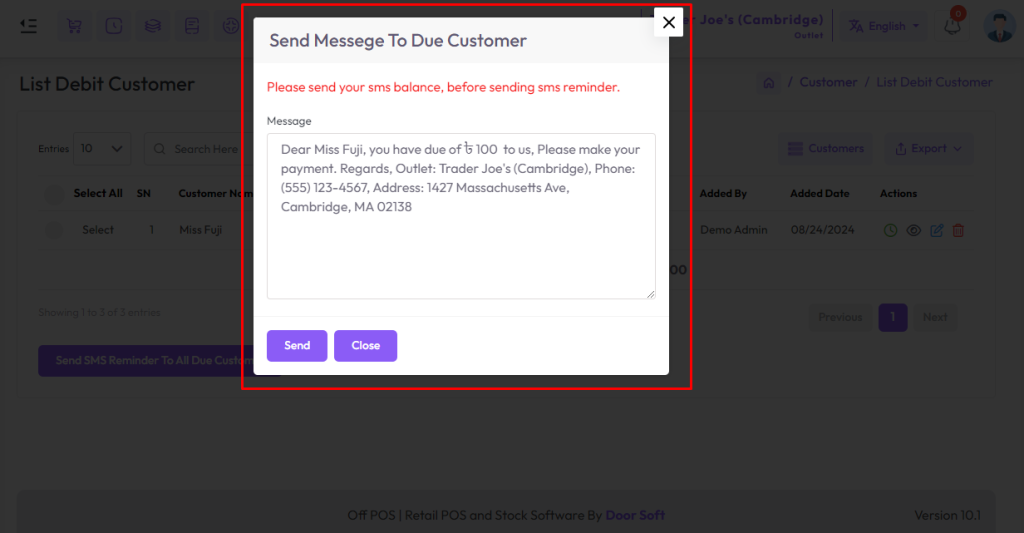
After clicking on “Send SMS Reminder To All Due Customer” button you will see a popup modal, customize the message if you want after that click on “Send” button to send reminder.

You can send SMS or reminder to only 1 person if you want. click on “Send Payment Reminder” button.
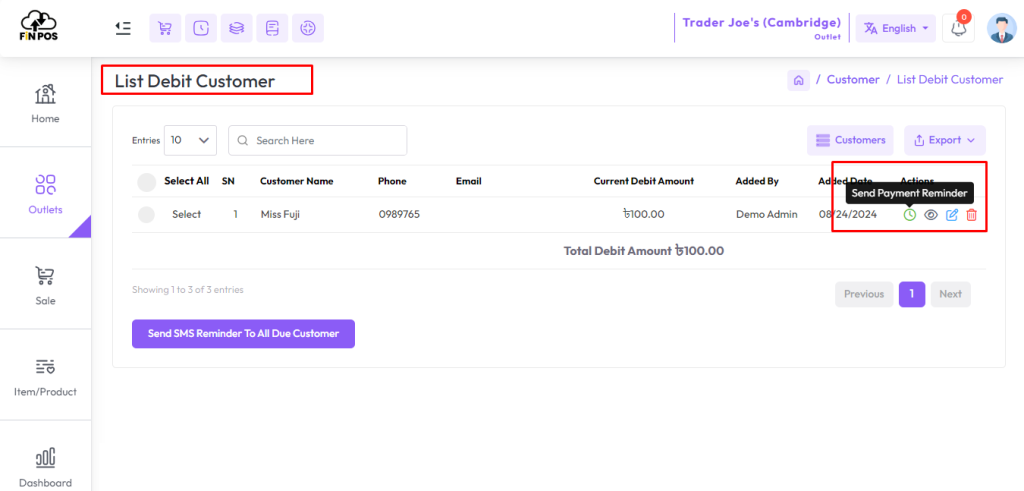
After clicking on “Send Payment Reminder” button you will get a popup modal, customize the message if you want after that click on “Send” button to send reminder.
Add Customer Receive
To receive customer dues Expand Customer Receive Menu form the left sidebar, After that click on “Add Customer Receive” menu.
To complete the process, you must fill in all the required fields in the form. Make sure the information is correct before proceeding. Once everything is entered, review the details carefully. Finally, click on the Submit button to save your record.
Fill in all the required fields in the form
Ensure the information entered is correct
Review details before final submission
Click Submit to save the record
Print Receive Receipt
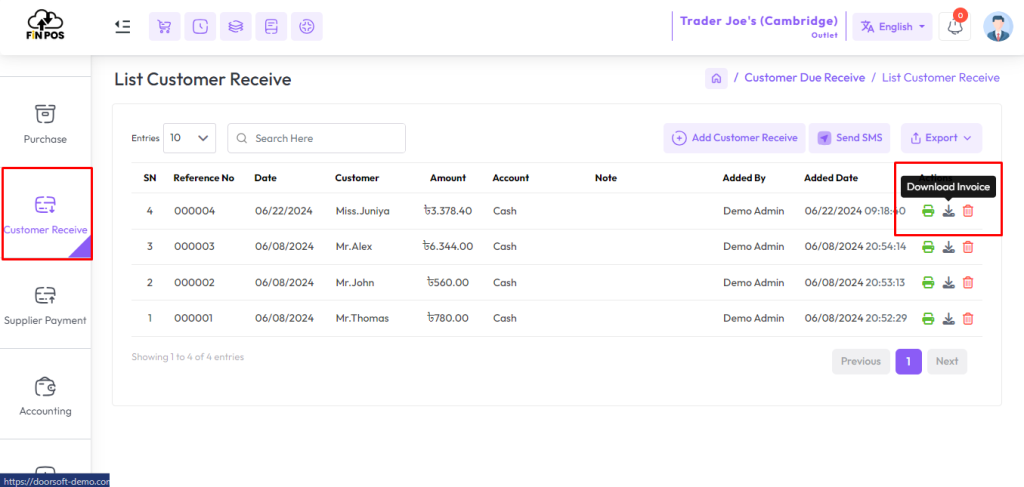
To Print “Customer Due Receive” receipt expand the Customer Receive menu from the left sidebar and click on “List Customer Receive” menu afer that click on the “Print Invoice” button to print “Customer Due Receive”
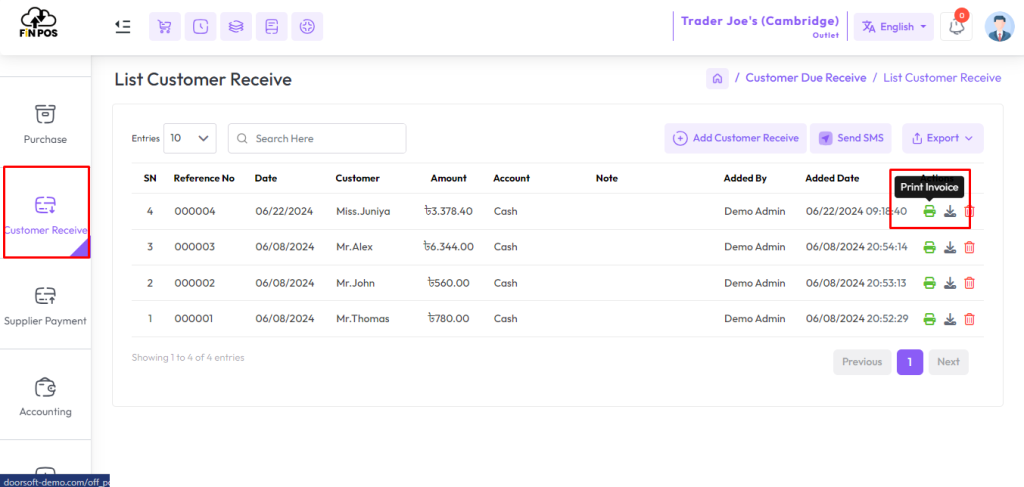
You can also download the Customer Due Receive receipt directly from the system. This helps you keep a record of the payment received from the customer. The receipt contains all the transaction details for reference. Simply click on the Download Invoice button to get the receipt.
Download the Customer Due Receive receipt
Keeps a record of customer payments received
Receipt includes complete transaction details
Click Download Invoice to get the receipt
Customer Ledger
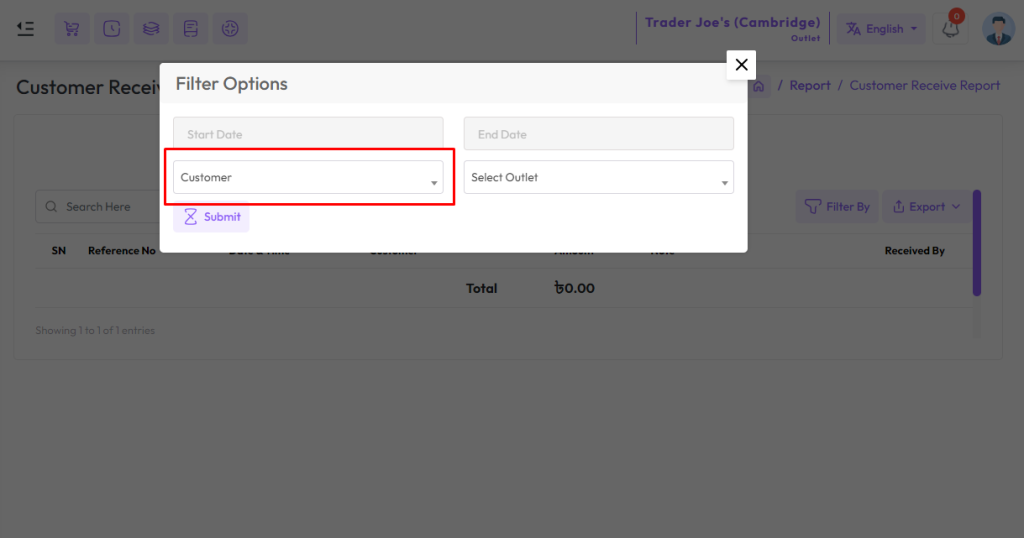
To view Customer Ledger Report Expand Report Menu and click Customer Ledger Report from the left sidebar. select a date to view the report within a specified date if needed. select a customer also you can select outlet from the outlet field to filter report according to outlet.

Customer Balance Report
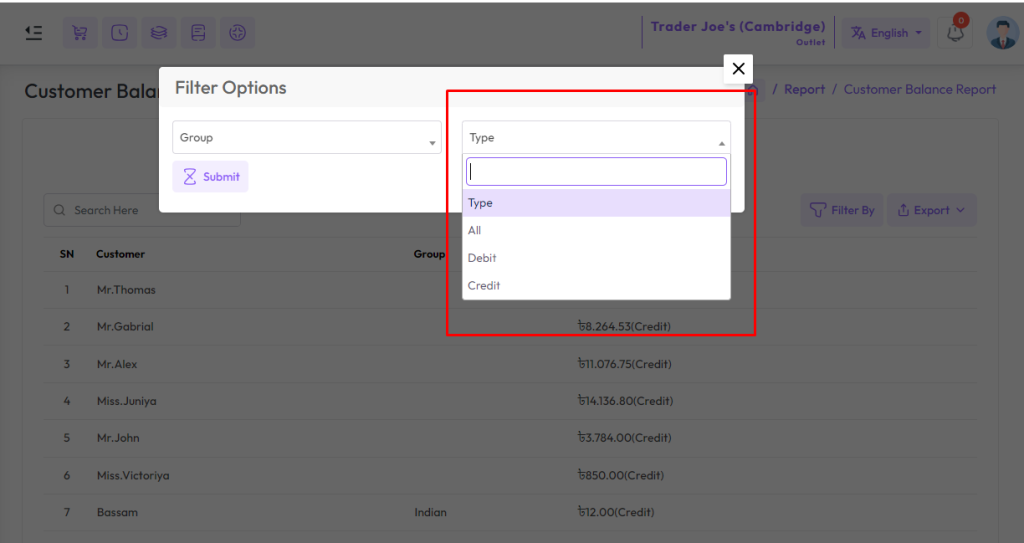
To view Customer Balance Report Expand Report Menu and click Customer Balance Report from the left sidebar. select customer balance type if needed also you can see “Debit” and “Credit” both customers.
Customer Receive Report
To view Customer Receive Report Expand Report Menu and click Customer Receive Report from the left sidebar. select a date to view the report within a specified date if needed. select a customer also you can select outlet from the outlet field to filter report according to outlet.