Working With Printer
Home / Documentation /
⚙️ Getting Started
🏪 Outlet
⚙️ Settings
🏧 Working With Counter
💰 Working Denomination
🛒 Make a Test Sale
👥 Employee Management
📅 Attendance
📋 Working with Tax
🏦 Account
📦 Working (General Item)
📦 Working (Variation Item)
📱 Working (IMEI Item)
🏷️ Working (Serial Item)
💊 Working (Medicine Item)
💳 Working (Installment Item)
🔧 Working (Service Item)
📊 Stock (General Item)
📊 Stock (Variation Item)
📊 Stock (IMEI Item)
📊 Stock (Serial Item)
📊 Stock (Medicine Item)
📊 Stock (Installment Item)
📥 Purchase (General Item)
📥 Purchase (Variation Item)
📥 Purchase (IMEI Item)
📥 Purchase (Serial Item)
📥 Purchase (Medicine Item)
📥 Purchase (Installment Item)
🏷️ Barcode & Label
🖨️ Working with Printer
🛒 Sale (General Item)
🛒 Sale (Variation Item)
🛒 Sale (IMEI Item)
🛒 Sale (Serial Item)
🛒 Sale (Medicine Item)
🛒 Sale (Installment Item)
🔧 Sale (Service Item)
🌐 Multivendor e-Commerce
📧 Working with Email
💬 Working with SMS
💳 Payment Gateway Setting
💬 Working with WhatsApp
👤 Working with Customer
🏢 Working with Supplier
📤 Purchase Return (General Item)
📤 Purchase Return (Variation Item)
📤 Purchase Return (IMEI Item)
📤 Purchase Return (Serial Item)
📤 Purchase Return (Medicine Item)
📤 Purchase Return (Installment Item)
🔄 Sale Return (General Item)
🔄 Sale Return (Variation Item)
🔄 Sale Return (IMEI Item)
🔄 Sale Return (Serial Item)
🔄 Sale Return (Medicine Item)
🔄 Sale Return (Installment Item)
📊 Dashboard
🎁 Promotion & Coupon
🏆 Loyalty
💳 Installment Sale
🔧 Warranty/Servicing
📈 Income
📉 Expense
💰 Salary/Payroll
📋 Quotation
🔄 Transfer (General Item)
🔄 Transfer (Variation Item)
🔄 Transfer (IMEI Item)
🔄 Transfer (Serial Item)
🔄 Transfer (Medicine Item)
🔄 Transfer (Installment Item)
❌ Damage (General Item)
❌ Damage (Variation Item)
❌ Damage (IMEI Item)
❌ Damage (Serial Item)
❌ Damage (Medicine Item)
❌ Damage (Installment Item)
🏢 Fixed Asset
📊 Report
🔄 Update Software
❌ Uninstall License
Supports for Printer and Printing Facility
- 56mm and 80mm Thermal Printer Support: System is able to print in 56mm and 80mm thermal printers.
- Network Printer Support with Print Server: System is to print in network printer directly using print server.
- A4 Printer and A5 Printer supported: System is able to print in a4 print and a5 print.
- Letterhead Print supported: System is able to print Letterhead Print.
- Network Printer Support with Print Server: System is to print in network printer directly using print server.
Our print server supported printers are:
- 3nStar RPT-008
- Approx APPPOS80AM
- AURES ODP-333
- AURES ODP-500
- Bematech-4200-TH
- Bematech LR2000E
- Birch PRP-085III
- Bixolon SRP-350III
- Bixolon SRP-350Plus
- Black Copper BC-85AC
- CHD TH-305N
- Citizen CBM1000-II
- Citizen CT-S310II
- Dapper-Geyi Q583P
- Daruma DR800
- DR-MP200 (manufacturer unknown)
- EPOS TEP 220M
- Elgin i9
- Epson EU-T332C
- Epson FX-890 (requires feedForm() to release paper).
- Epson TM-T20
- Epson TM-T20II
- Epson TM-T70
- Epson TM-T70II
- Epson TM-T81
- Epson TM-T82II
- Epson TM-T88II
- Epson TM-T88III
- Epson TM-T88IV
- Epson TM-T88V
- Epson TM-U220
- Epson TM-U295 (requires release() to release slip).
- Epson TM-U590 and TM-U590P
- Equal (EQ-IT-001) POS-58
- Everycom EC-58
- Excelvan HOP-E200
- Excelvan HOP-E58
- Excelvan HOP-E801
- Gainscha GP-2120TF
- Gainscha GP-5890x (Also marketed as EC Line 5890x)
- Gainscha GP-U80300I (Also marketed as gprinter GP-U80300I)
- gprinter GP-U80160I
- HOIN HOP-H58
- Ithaca iTherm 28
- Hasar HTP 250
- Metapace T-1
- Metapace T-25
- Nexa PX700
- Nyear NP100
- OKI RT322
- OKI 80 Plus III
- Orient BTP-R580
- P-822D
- P85A-401 (make unknown)
- Partner Tech RP320
- POSLIGNE ODP200H-III-G
- QPOS Q58M
- Rongta RP326US
- Rongta RP58-U
- Rongta RP80USE
- SAM4S GIANT-100DB
- Senor TP-100
- Sewoo SLK-TS400
- SEYPOS PRP-96
- SEYPOS PRP-300 (Also marketed as TYSSO PRP-300)
- SNBC BTP-R880NPIII
- Solux SX-TP-88300
- Sicar POS-80
- Silicon SP-201 / RP80USE
- SPRT SP-POS88V
- Star BSC10
- Star TSP100 ECO
- Star TSP100III FuturePRNT
- Star TSP-650
- Star TUP-592
- TVS RP45 Shoppe
- Venus V248T
- Xeumior SM-8330
- Xprinter F-900
- Xprinter XP-365B
- Xprinter XP-58 Series
- Xprinter XP-80C
- Xprinter XP-90
- XPrinter XP-Q20011
- Xprinter XP-Q800
- Zjiang NT-58H
- Zjiang ZJ-5870
- Zjiang ZJ-5890 (Also sold as POS-5890 by many vendors; ZJ-5890K, ZJ-5890T also work).
- Zjiang ZJ-8220 (Also marketed as Excelvan ZJ-8220)
- Zjiang ZJ-8250
Note: in case your printer is not in the above list then you need to make sure that your printer supports the network connection and ESC/POS command.
- Browser Popup Printing: In case you don’t have any network printer, you may choose browser popup printing.
- USB Printing Support: You can also use a USB Printer for printing.
Add Printer
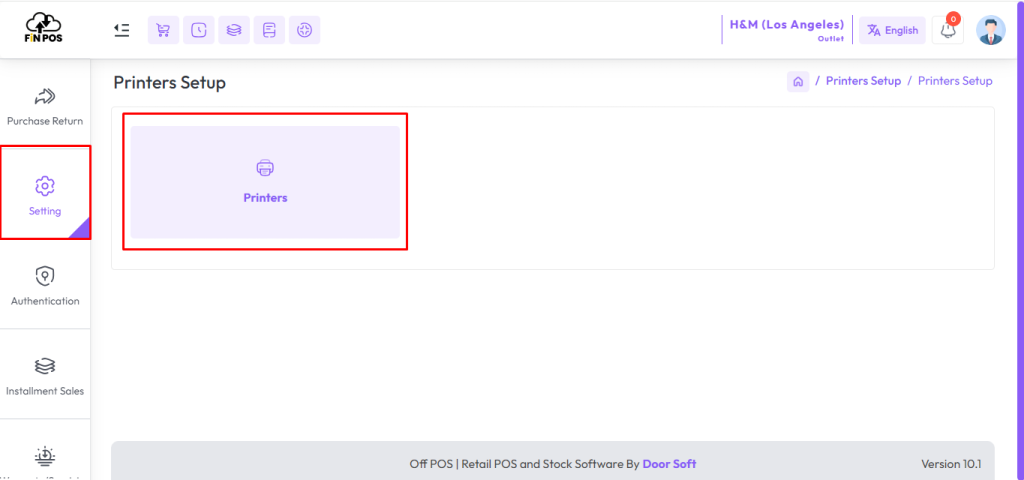
To Setup Printer or Add Printer expand “Setting” menu click on the “Printer Setup” menu from the left sidebar after clicking that you will see an interface like below snapshot.
Click on the “Printer” Card
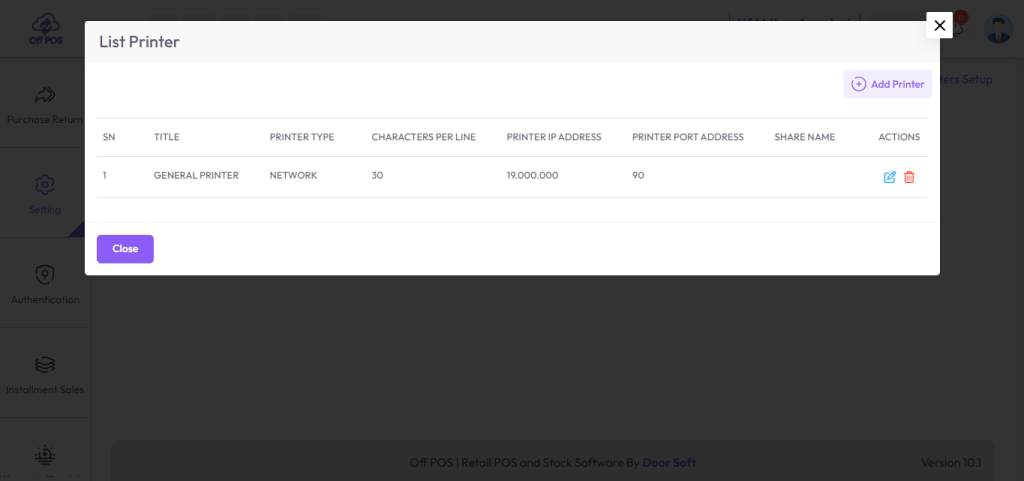
Click the Add Printer button to Add a new Printer.
After clicking the Add Printer button, you will see an interface similar to the snapshot below.
Select the printer type from the Printing Choice field.
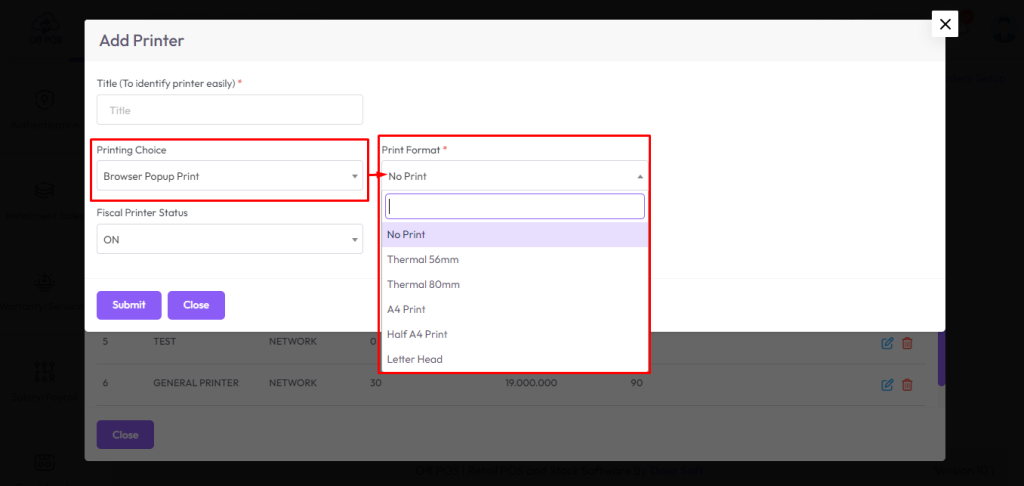
After selecting Thermal 56 or 80mm you will see two additional fields, Invoice QR Code Status and QR Code Type, Invoice QR Code Status and QR Code Type doesn’t work a4,Half A4 Print and Letter Head.
Select Enable from Invoice QR Code Status field, to show QR code in 56mm and 80mm only.
Select a type from QR Code Type field.
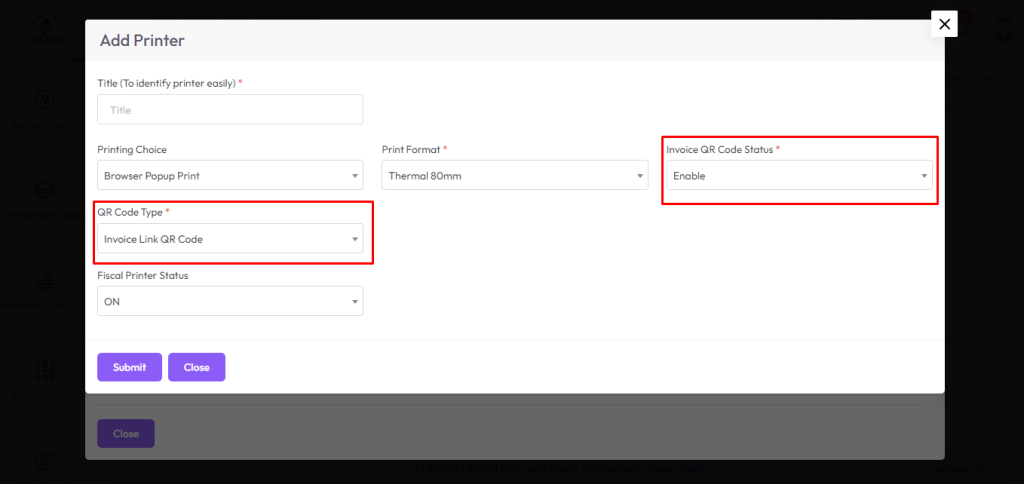
Select Direct Print from the Printing Choice field.
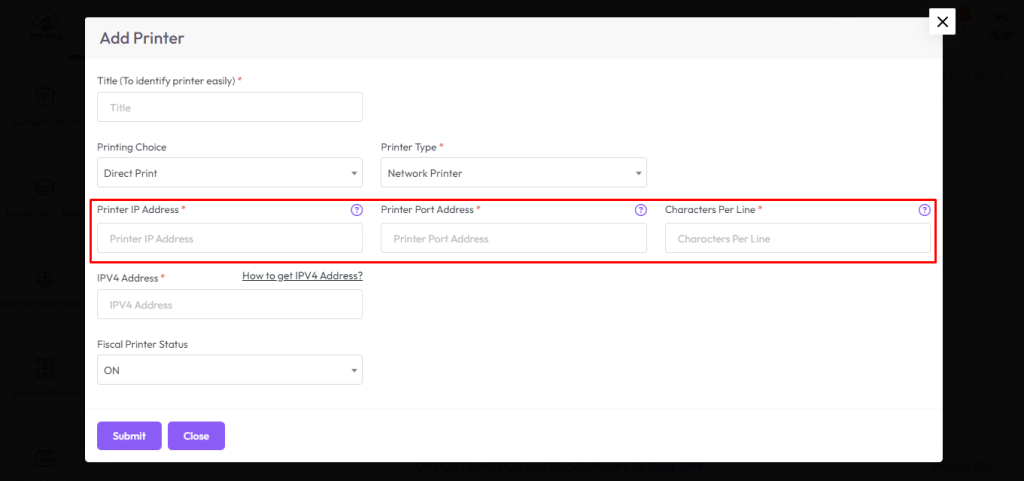
After selecting Direct Print you will see another field name as Printer Type, Select an option from Printer Type, after selecting Network Printer you will see four fields, i,Printer IP Address, ii,Printer Port Address, iii, Character Per Line, iv, IPV4 Address.
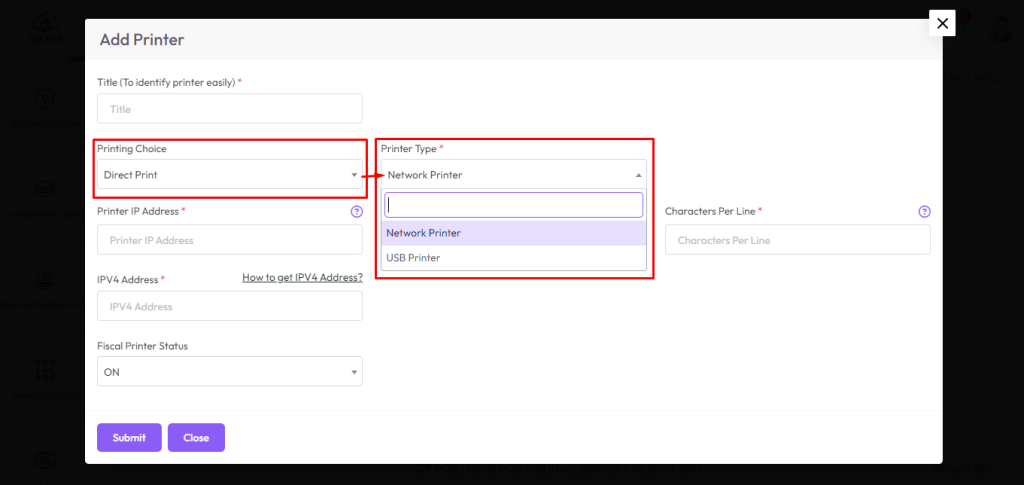
Enter the IP address in the IP address field.
Enter the Printer Port Address in the Printer Port Address field.
Enter the Character Per Line in the Character Per Line field.
Enter the IPV4 in the IPV4 field.
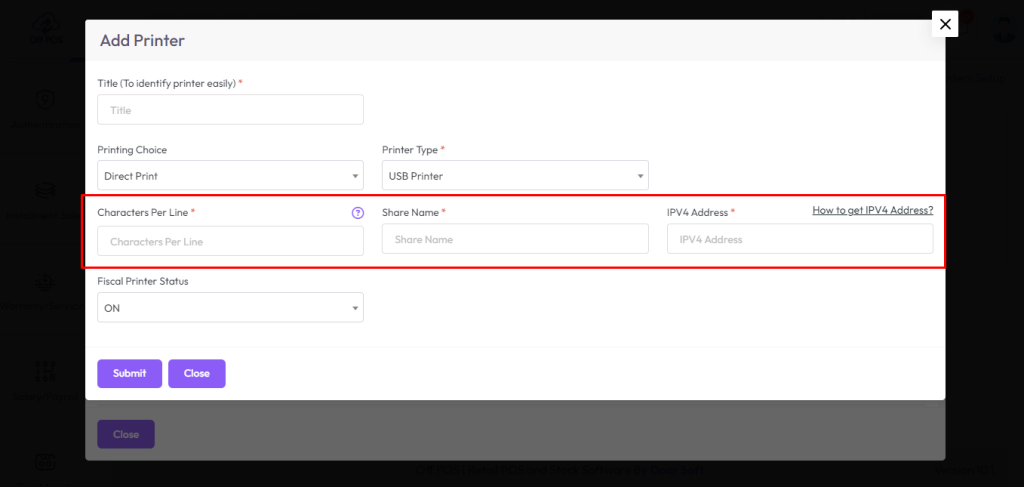
After selecting USB Printer you will see three fields, i,Character Per Line, ii,Share Name, iv, IPV4 Address.
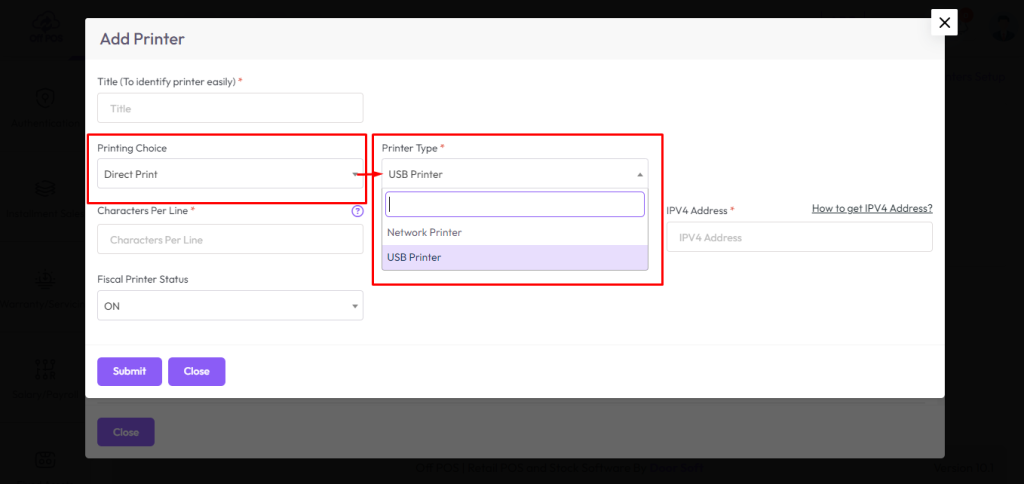
Enter the Character Per Line in the Character Per Line field.
Enter the Share in the Share field.
Enter the IPV4 in the IPV4 field.
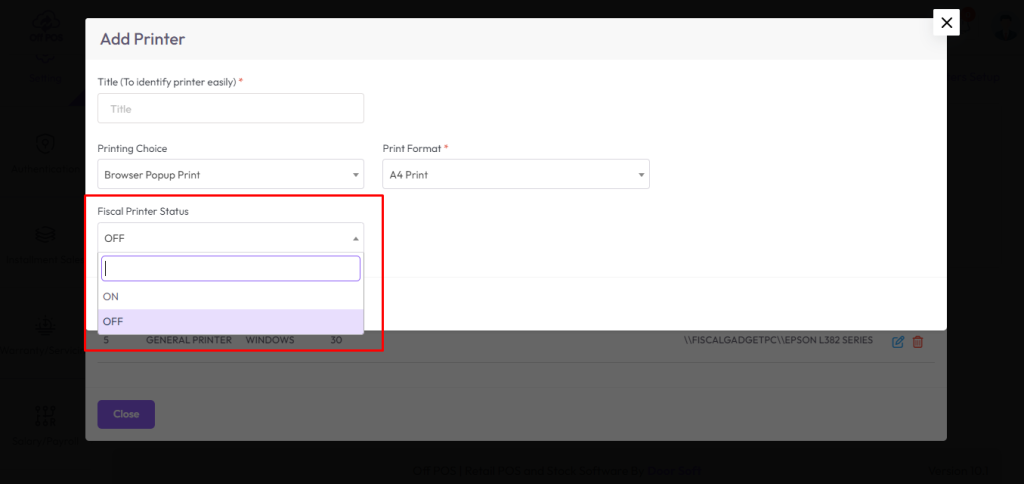
Keep Enable to print via fiscal printer.
Setup Print Server for USB Printer
“If your script is running on localhost using xampp/wamp or any other’s server then you can skip this step”
Install Xampp: XAMPP is a web server solution, we need to install xampp due to run print server script.
Download xampp from this link as per your operating system.
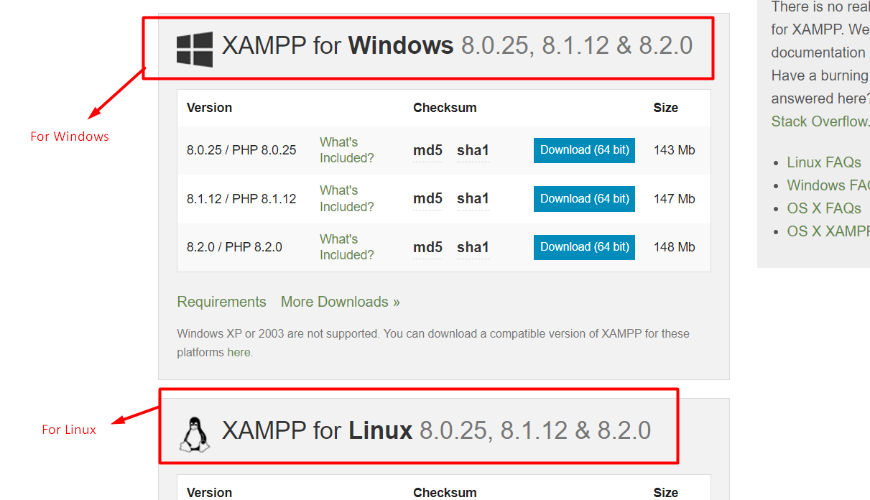
After download- install the xampp in any drive except C: (for safety), you may install it in D:, E: etc.
Now click on the Config button and then click Apache (httpd.conf) for some changes.
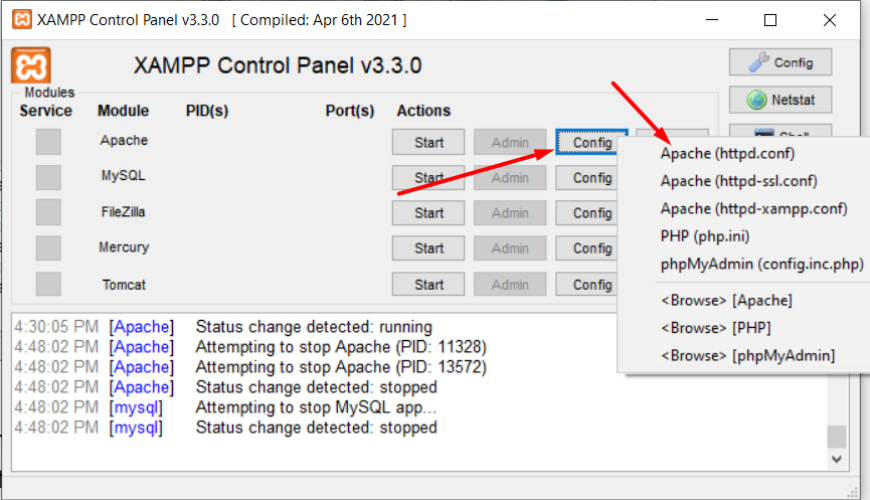
Search denied and replace with granted, you may get 3 or 4 denied in this file so replace all with granted.
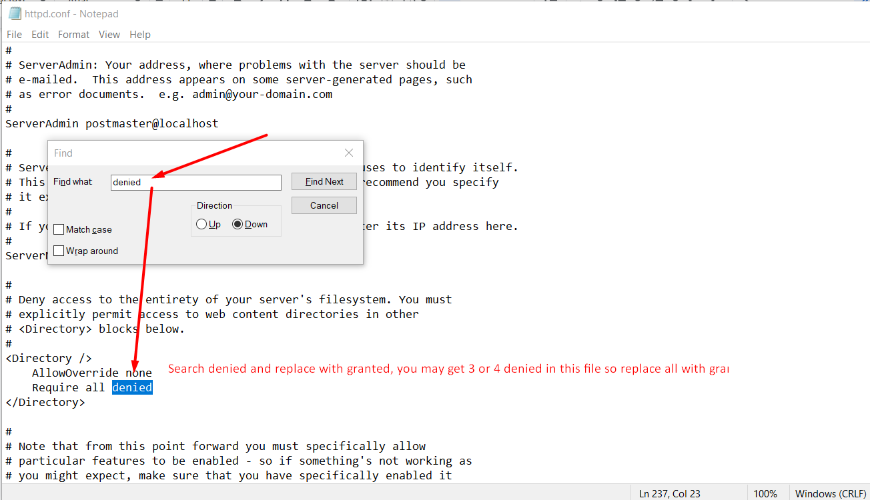
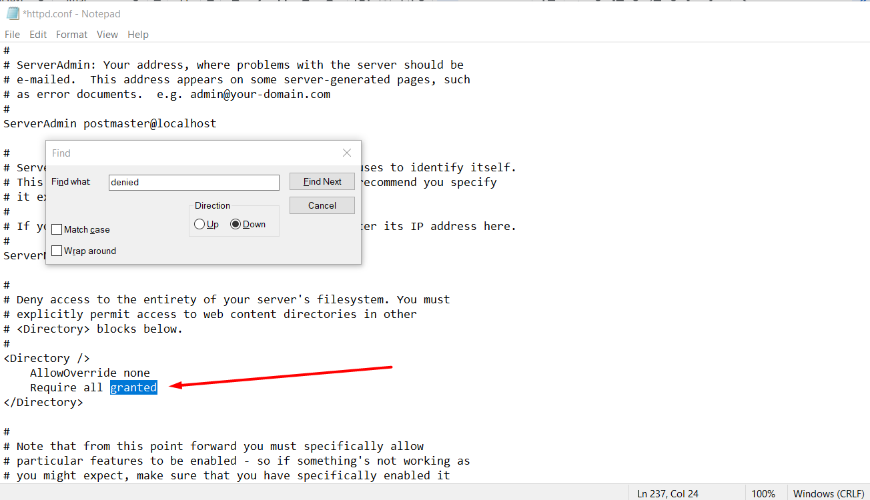
Finally save this file.
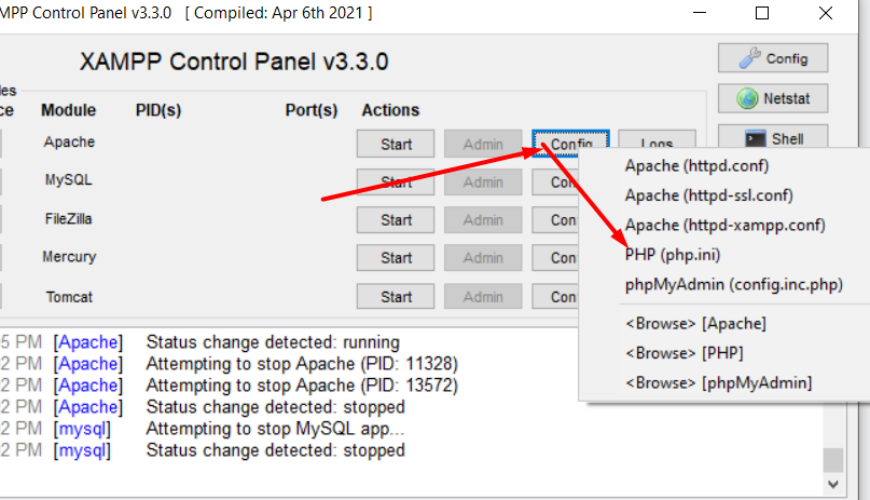
Now click on the Config button and then click PHP (php.ini) for some changes.
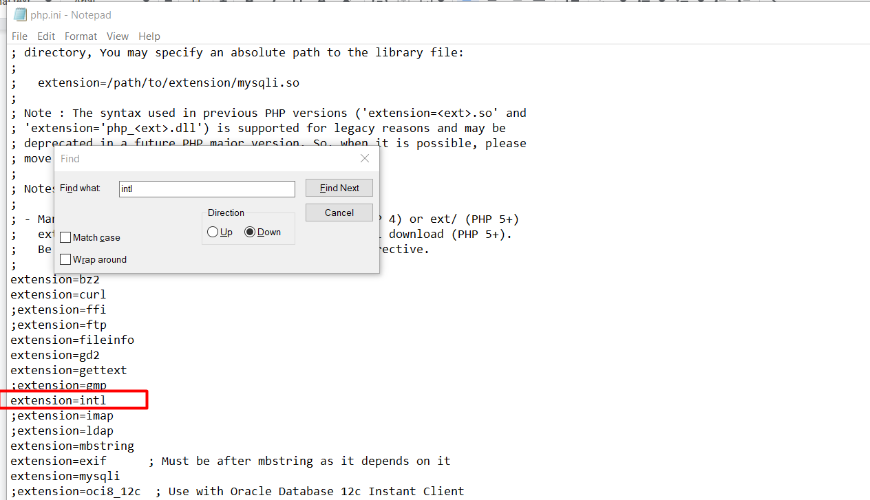
We need to enable the intl extension from here, so search intl and remove the comma sign from first of this line to save this file.
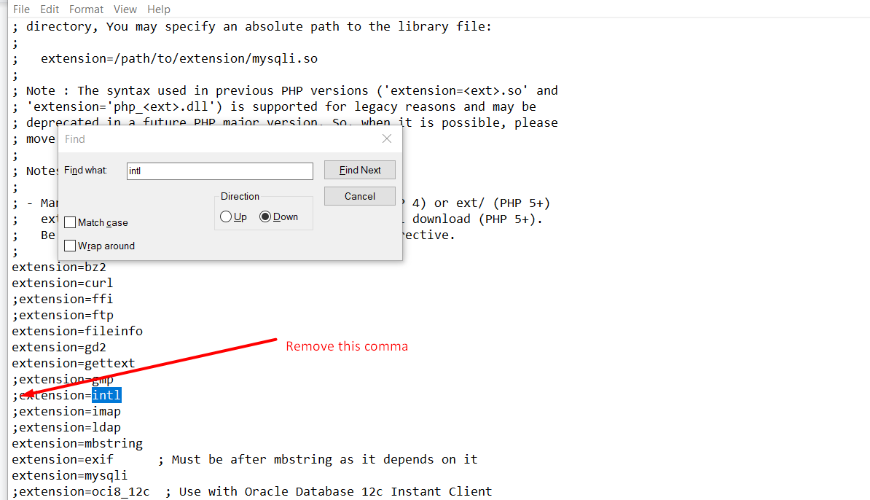
After changes look like
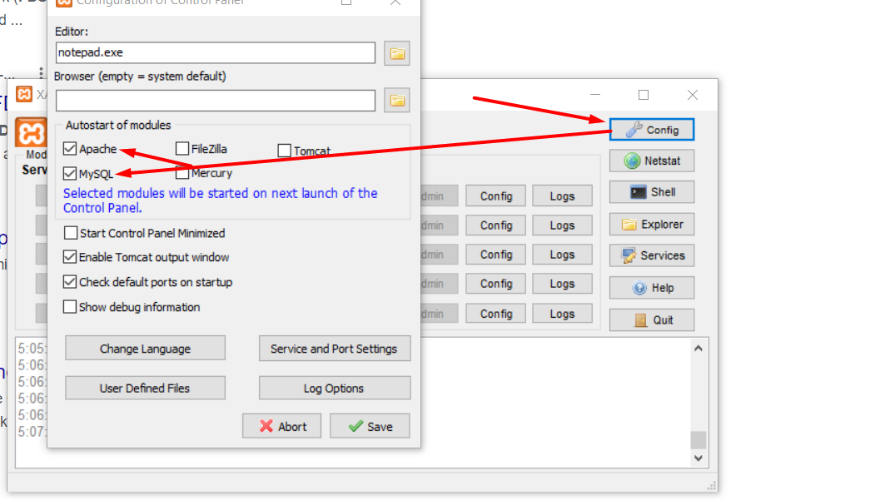
System will auto start after opening the xampp server if you set this setting otherwise you need to start manually.
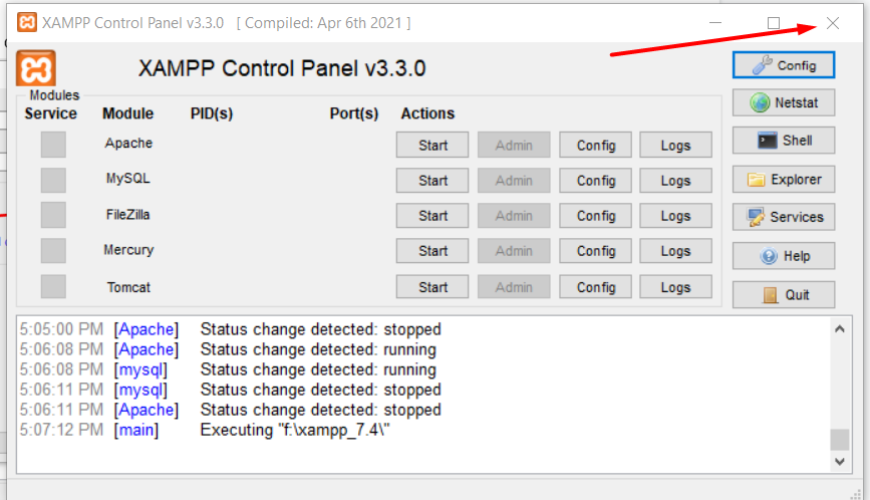
Now close the window.
And open again.
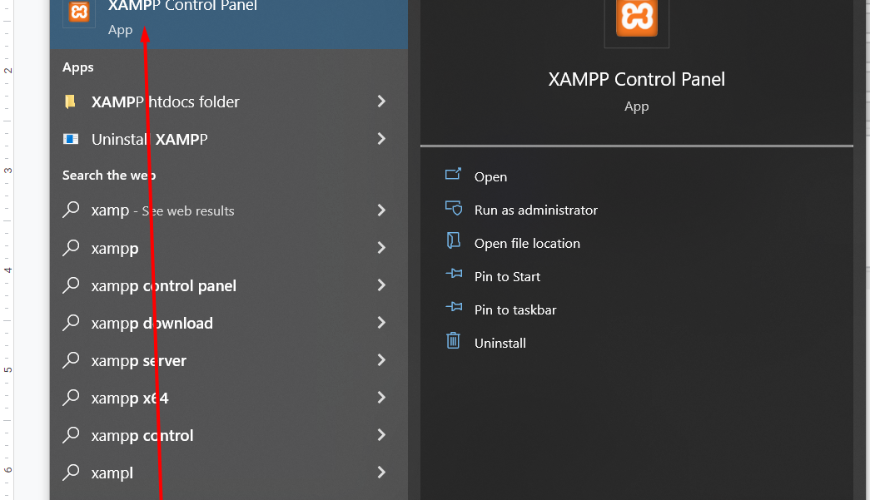
Now the Apache and MySQL Server will start automatically because of the previous setting that we did.
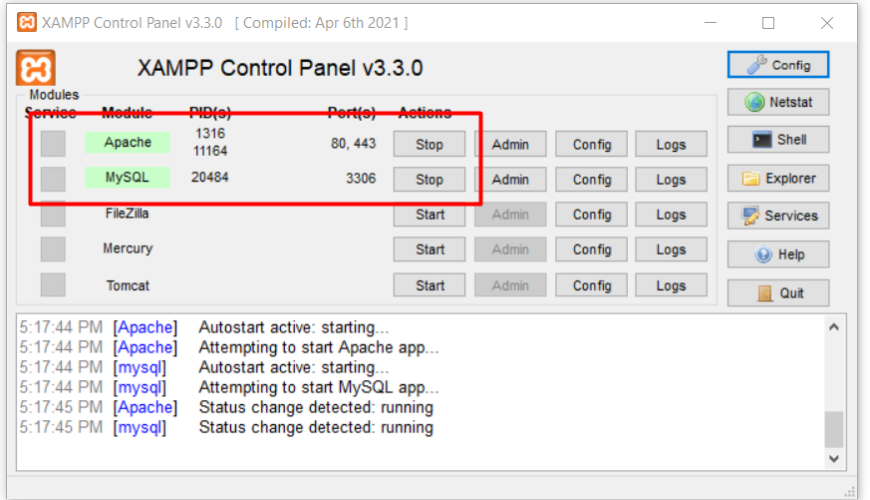
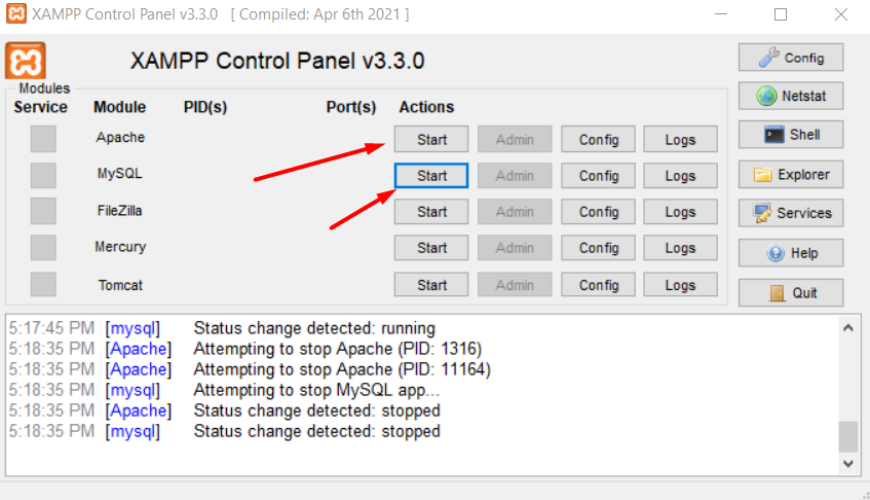
If your system does not open automatically then click on this button to start both.
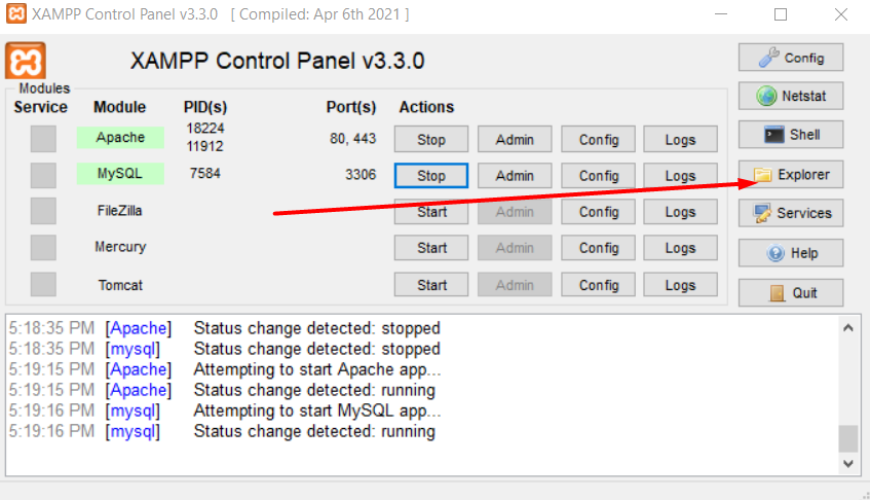
Now we will run the print server script so click on the Explorer
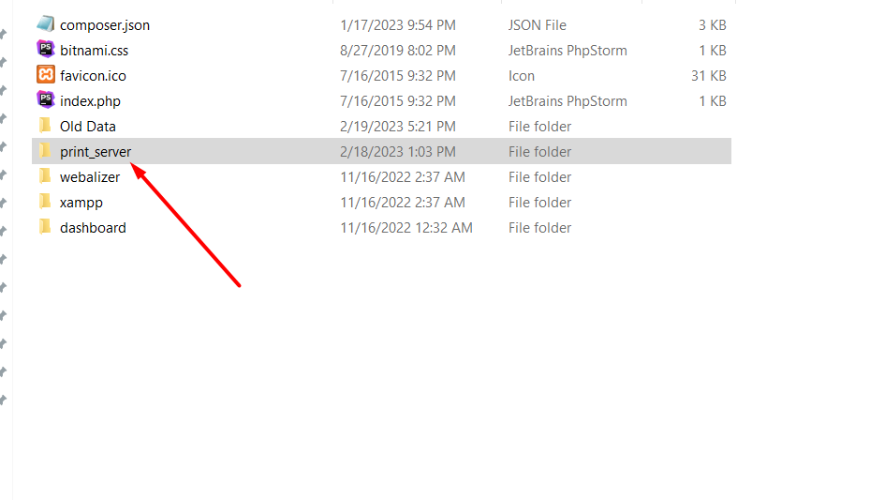
Put the print server script in the following path: xampp/htdocs/
You will get the script of our project root path just copy and paste here.
Now we will check the test print.
Note: You must make sure your printer is successfully connected otherwise the system will not work.
If your Network Printer is connected with ethernet then you may check connection status.
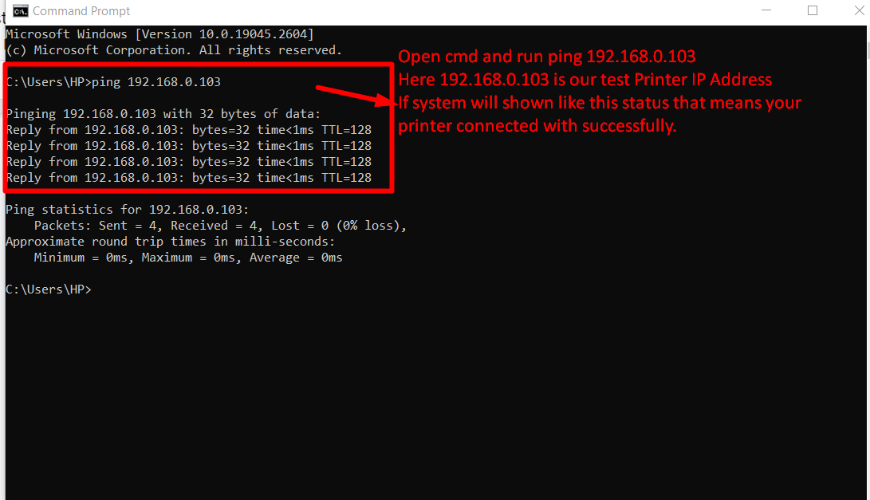
Open your browser and hit this URL: http://localhost/print_server/ and it will looks like below
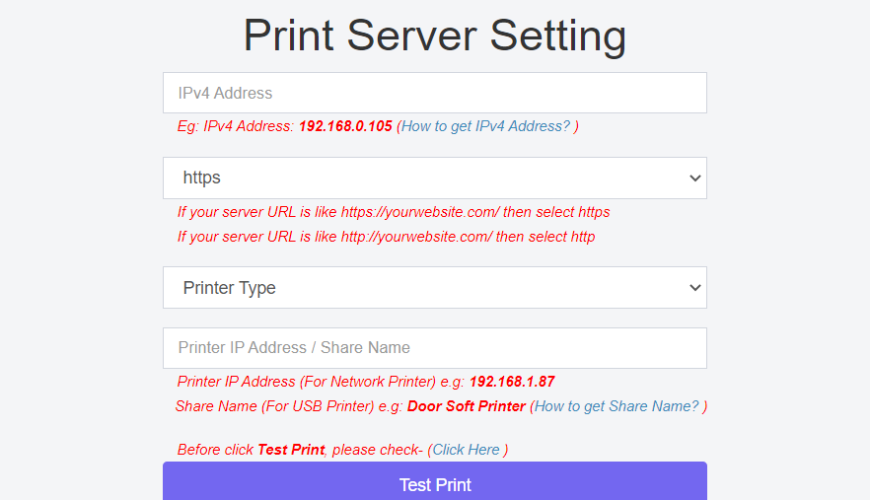
- Enter IPv4 address.
- Select https or http as per your server installation URL.
- Select Printer Type, in case your printer is network type then you need to select Network Printer or USB printer.
- If your printer is Network Printer then you need to add Printer IP address, how to get the Printer IP Address- First make sure your printer successfully connected with Network then print a test print paper from your printer as per your printer model and then you will get Printer IP address and Printer Port Address.
In maximum case the Printer Port Address is 9100 but in case it is different please do a test print from your printer after turning it on, you will get the Printer Port Address in that test print paper.
- If your printer is USB then you need to put Share Name
Note: Please follow all instructions carefully in this form.
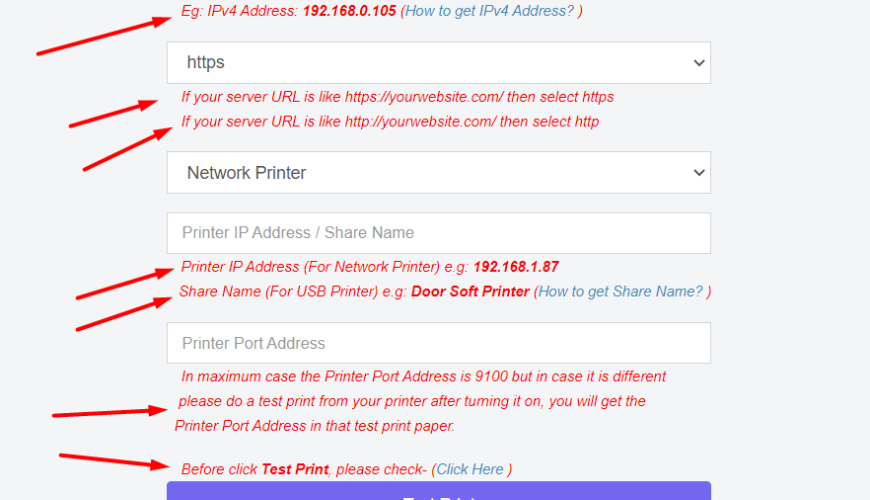
Please do a Test Print. If everything is ok, you will get a test print out otherwise check all of the steps again.In USB printing Arabic language is not supported.
Setup Letter Head Printer
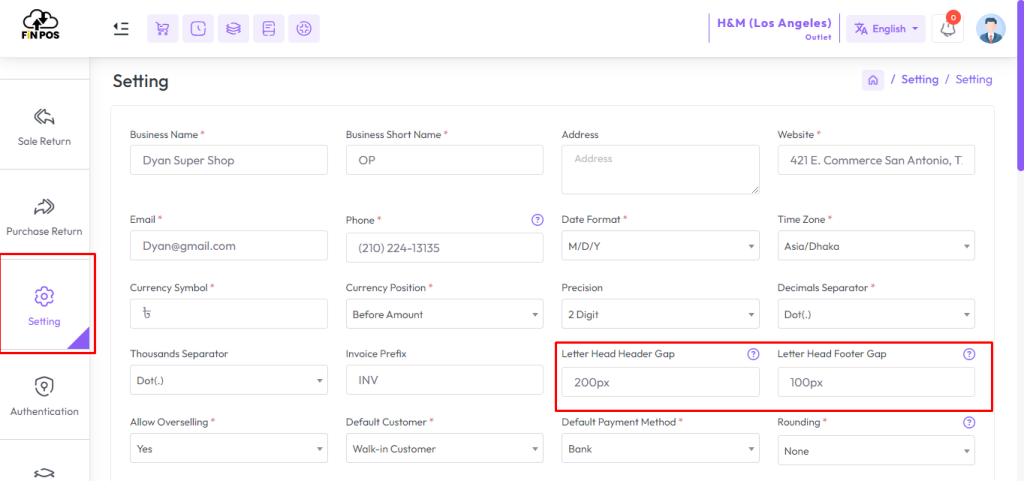
To setup letterhead heading gap and footer gap expand “Setting” menu from the left sidebar after clicking on Setting menu you will see the below interface, enter letterhead header Gap in “Letter Head Header Gap” field, enter Letterhead footer gap in “Letter Head Footer Gap” field
Enter the “px” after the number, just giving the number will not work. Example: enter 100px or 300px, don’t leave only numbers like 100, 200.