Warranty / Servicing
Home / Documentation /
⚙️ Getting Started
🏪 Outlet
⚙️ Settings
🏧 Working With Counter
💰 Working Denomination
🛒 Make a Test Sale
👥 Employee Management
📅 Attendance
📋 Working with Tax
🏦 Account
📦 Working (General Item)
📦 Working (Variation Item)
📱 Working (IMEI Item)
🏷️ Working (Serial Item)
💊 Working (Medicine Item)
💳 Working (Installment Item)
🔧 Working (Service Item)
📊 Stock (General Item)
📊 Stock (Variation Item)
📊 Stock (IMEI Item)
📊 Stock (Serial Item)
📊 Stock (Medicine Item)
📊 Stock (Installment Item)
📥 Purchase (General Item)
📥 Purchase (Variation Item)
📥 Purchase (IMEI Item)
📥 Purchase (Serial Item)
📥 Purchase (Medicine Item)
📥 Purchase (Installment Item)
🏷️ Barcode & Label
🖨️ Working with Printer
🛒 Sale (General Item)
🛒 Sale (Variation Item)
🛒 Sale (IMEI Item)
🛒 Sale (Serial Item)
🛒 Sale (Medicine Item)
🛒 Sale (Installment Item)
🔧 Sale (Service Item)
🌐 Multivendor e-Commerce
📧 Working with Email
💬 Working with SMS
💳 Payment Gateway Setting
💬 Working with WhatsApp
👤 Working with Customer
🏢 Working with Supplier
📤 Purchase Return (General Item)
📤 Purchase Return (Variation Item)
📤 Purchase Return (IMEI Item)
📤 Purchase Return (Serial Item)
📤 Purchase Return (Medicine Item)
📤 Purchase Return (Installment Item)
🔄 Sale Return (General Item)
🔄 Sale Return (Variation Item)
🔄 Sale Return (IMEI Item)
🔄 Sale Return (Serial Item)
🔄 Sale Return (Medicine Item)
🔄 Sale Return (Installment Item)
📊 Dashboard
🎁 Promotion & Coupon
🏆 Loyalty
💳 Installment Sale
🔧 Warranty/Servicing
📈 Income
📉 Expense
💰 Salary/Payroll
📋 Quotation
🔄 Transfer (General Item)
🔄 Transfer (Variation Item)
🔄 Transfer (IMEI Item)
🔄 Transfer (Serial Item)
🔄 Transfer (Medicine Item)
🔄 Transfer (Installment Item)
❌ Damage (General Item)
❌ Damage (Variation Item)
❌ Damage (IMEI Item)
❌ Damage (Serial Item)
❌ Damage (Medicine Item)
❌ Damage (Installment Item)
🏢 Fixed Asset
📊 Report
🔄 Update Software
❌ Uninstall License
Add Servicing
To add a new Servicing item, first expand the Warranty/Servicing menu from the left sidebar.
Clicking on the Add Servicing menu allows you to create a new servicing record.
This helps in keeping track of all servicing items and their details efficiently.
It ensures proper management and monitoring of servicing activities.
Expand the Warranty/Servicing menu from the left sidebar.
Click on Add Servicing to create a new servicing record.
Keep track of all servicing items and details.
Manage and monitor servicing activities efficiently.
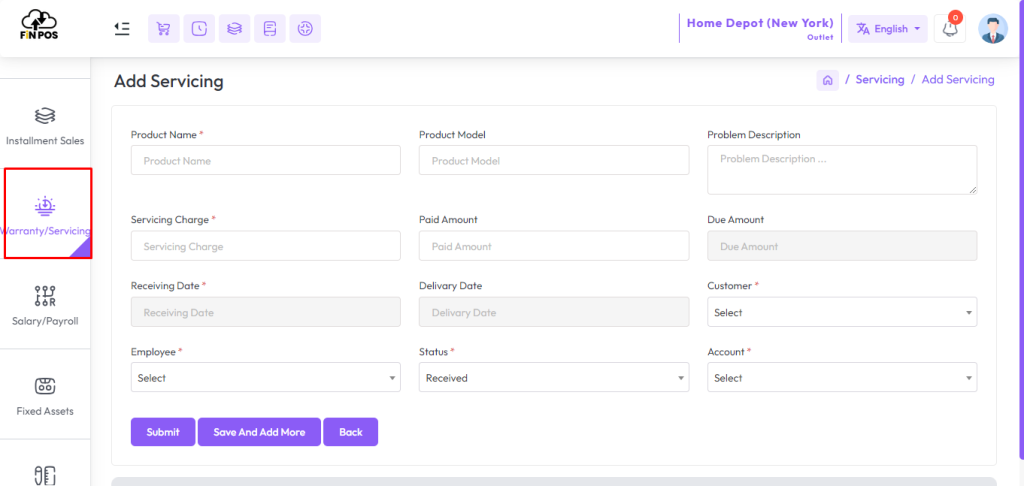
Fill up the required field and hit the submit button.
Edit Servicing
To edit any change or update the servicing delivery status expand “Warranty/Servicing” menu click on “List Servicing” menu from the left sidebar. click on edit button from action after clicking that you will see an interface below snapshot, Make modifications as needed..
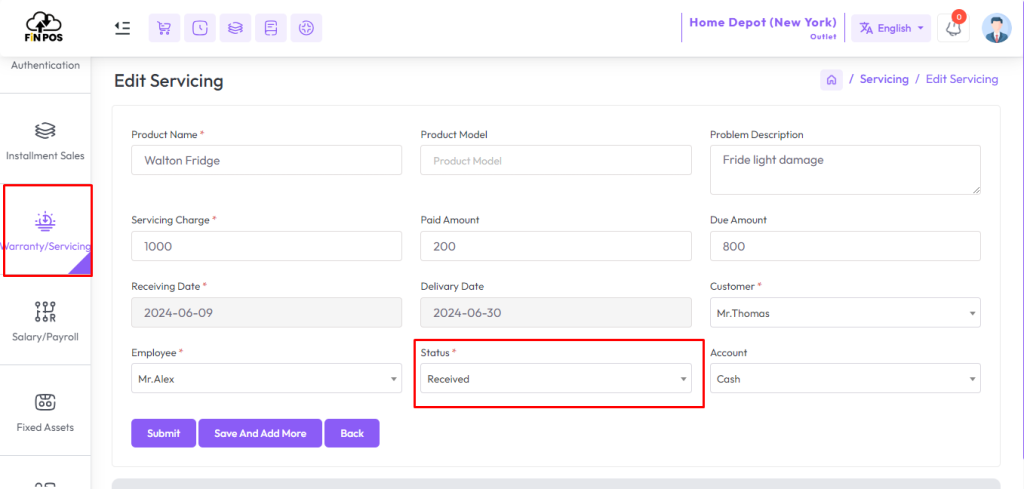
Fill up the required field and hit the submit button.
List Servicing
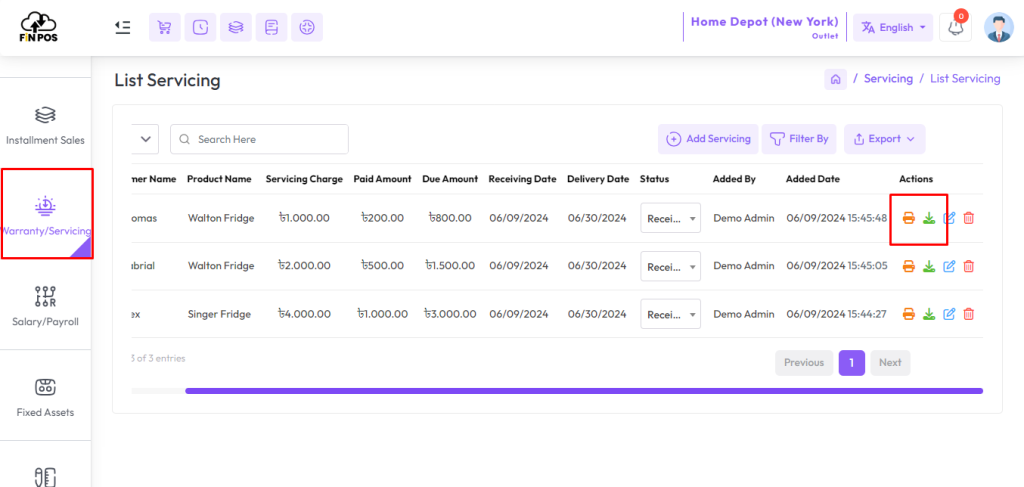
To view a list of servicing expand the “Warranty/Servicing” menu from the left sidebar, and click on the “List Servicing” menu.
Also you can change Delivery Status from List Servicing, change status from status column.
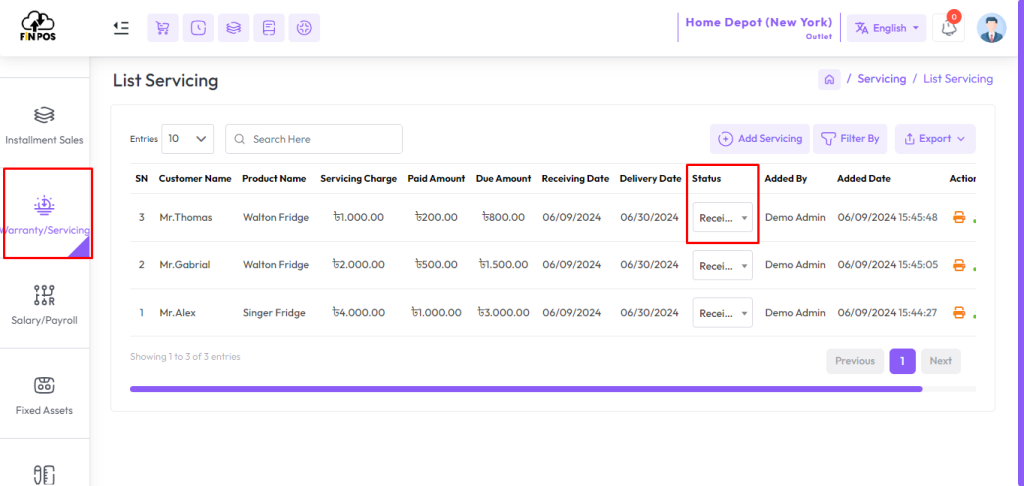
To handle a Servicing Invoice, use the options available in the Actions menu.
Clicking on Print Invoice allows you to get a hard copy of the invoice.
Clicking on Download Invoice lets you save a digital copy for your records.
These options help in managing and sharing servicing invoices efficiently.
Click on Print Invoice from Actions to print the invoice.
Click on Download Invoice from Actions to save the invoice digitally.
Get a hard copy for physical records.
Maintain a digital copy for easy access and sharing.
Warranty Checking by customer or customer invoice
To check a product’s warranty, first expand the Warranty/Checking menu from the left sidebar.
Clicking on the Warranty Checking menu allows you to verify warranty details for any product.
This helps in confirming whether a product is still under warranty before servicing or replacement.
It ensures proper tracking and management of warranty claims efficiently.
Expand the Warranty/Checking menu from the left sidebar.
Click on Warranty Checking to verify a product’s warranty.
Confirm if the product is still under warranty.
Track and manage warranty claims efficiently.
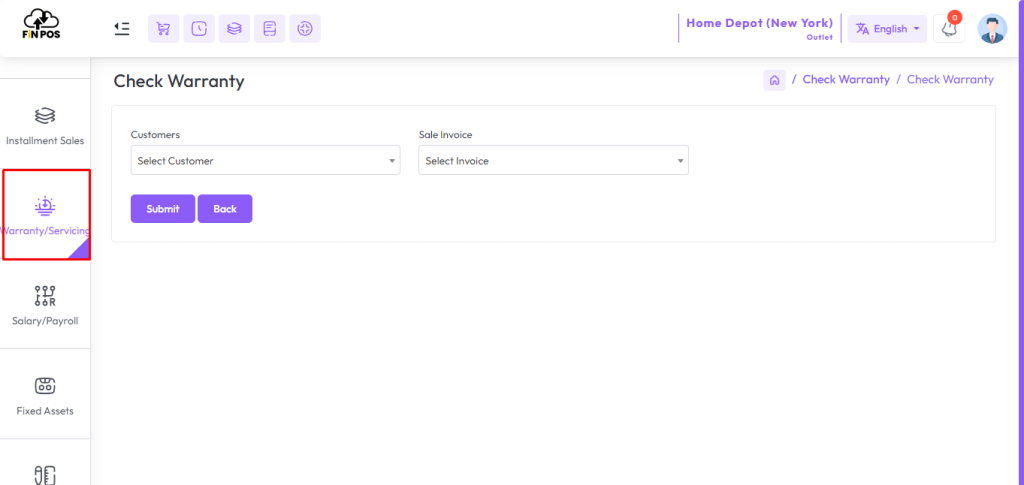
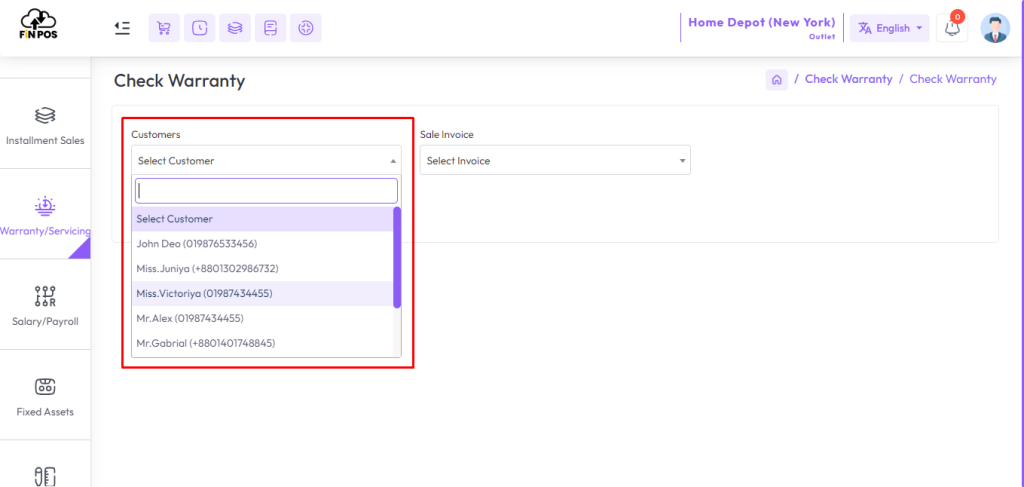
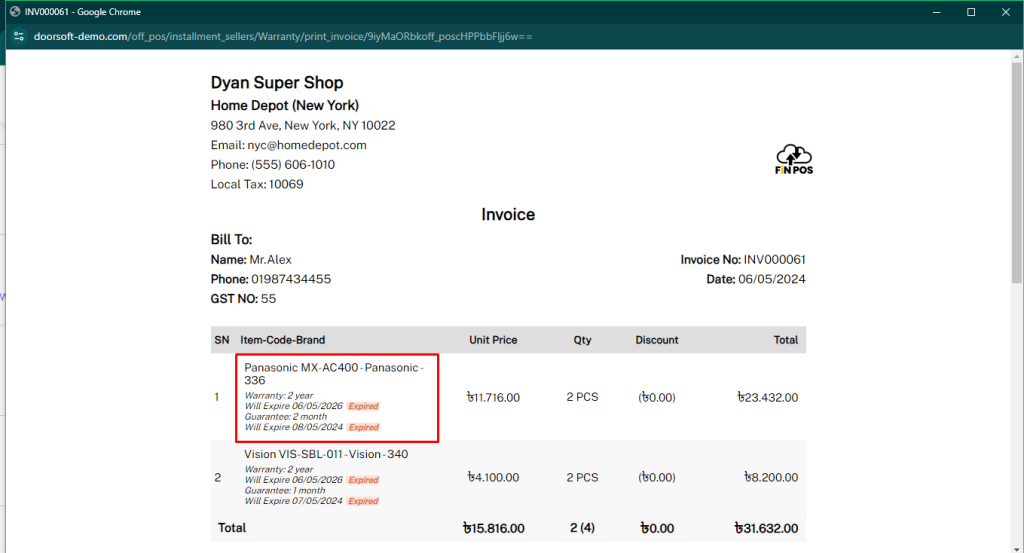
Select a customer from the customer field or search customer by customer name or mobile number from customer field.
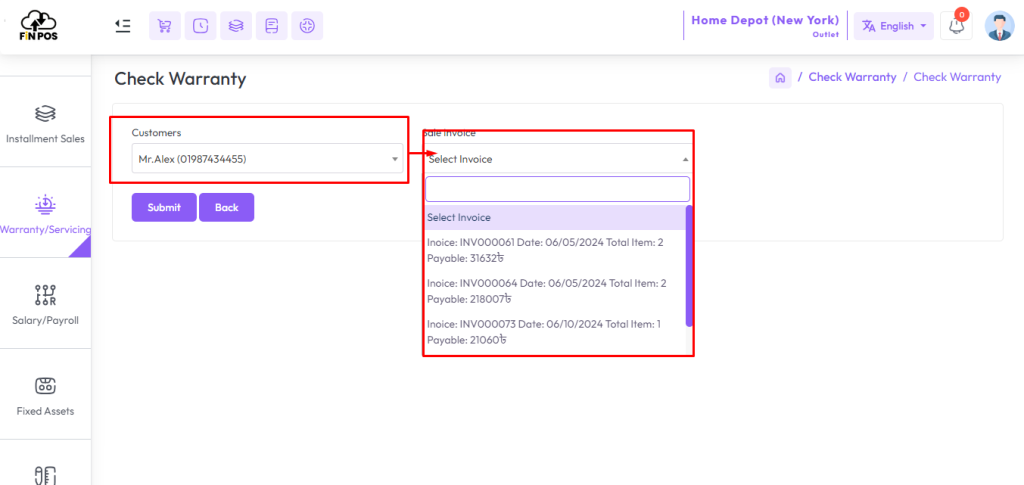
After selecting a customer, you will see all the invoices of that customer in the “Sales Invoice” field on the right side.
And click the desired invoice from the “Sales Invoice” field, and check the warranty and guarantee of the product.
Below is a snapshot of the invoice.
Add Warranty Products
To add a new Warranty Products item, first expand the Warranty/Servicing menu from the left sidebar.
Clicking on the Add Warranty Products menu allows you to create a new warranty product record.
This helps in keeping track of all products that come with a warranty efficiently.
It ensures proper management and monitoring of warranty products.
Expand the Warranty/Servicing menu from the left sidebar.
Click on Add Warranty Products to create a new warranty product record.
Keep track of all products with a warranty.
Manage and monitor warranty products efficiently.
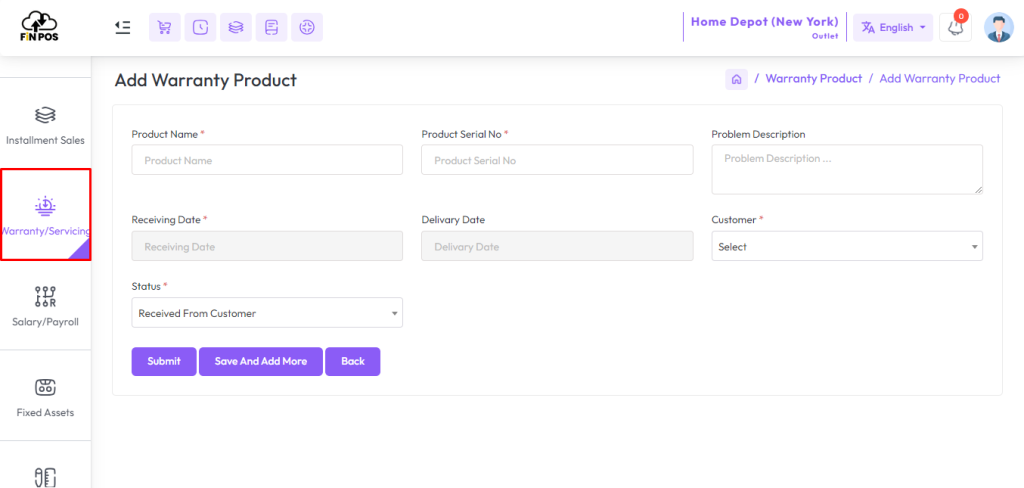
Fill up the required field and hit the submit button.
Edit Warranty Products
To edit a Warranty Product status or make any changes, first expand the Warranty/Servicing menu from the left sidebar.
Click on the List Warranty Product menu to view all existing warranty products.
From the list, select the product you want to update and click the Edit button in Actions.
This process allows you to modify product details or update warranty status efficiently.
Expand the Warranty/Servicing menu from the left sidebar.
Click on List Warranty Product to view all products.
Select the product and click the Edit button from Actions.
Update product details or warranty status efficiently.
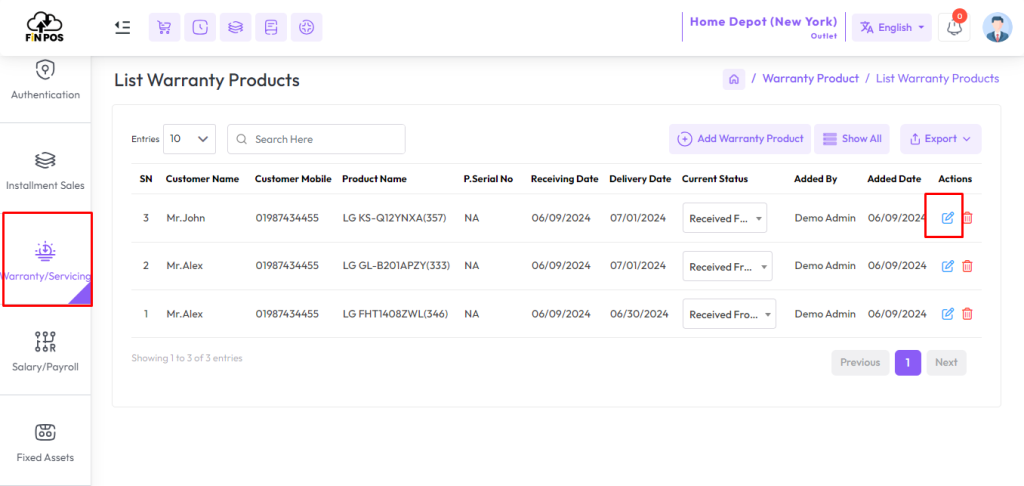
Edit the information as needed.
- After sending to vendor select Send to Vendor status.
- After received from vendor select Received from Vendor status.
- After delivered to customer select Delivered to Customer status.
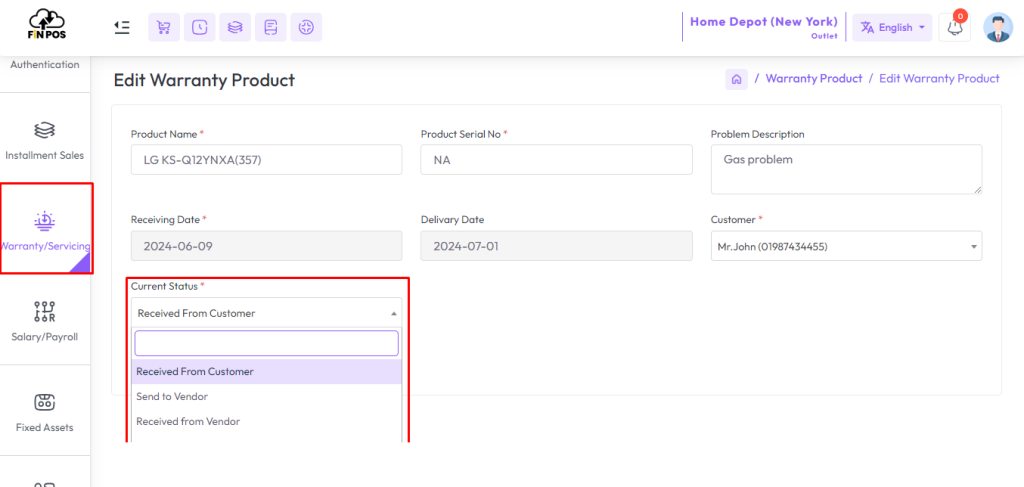
Fill up the required field and hit the submit button.
Servicing Report
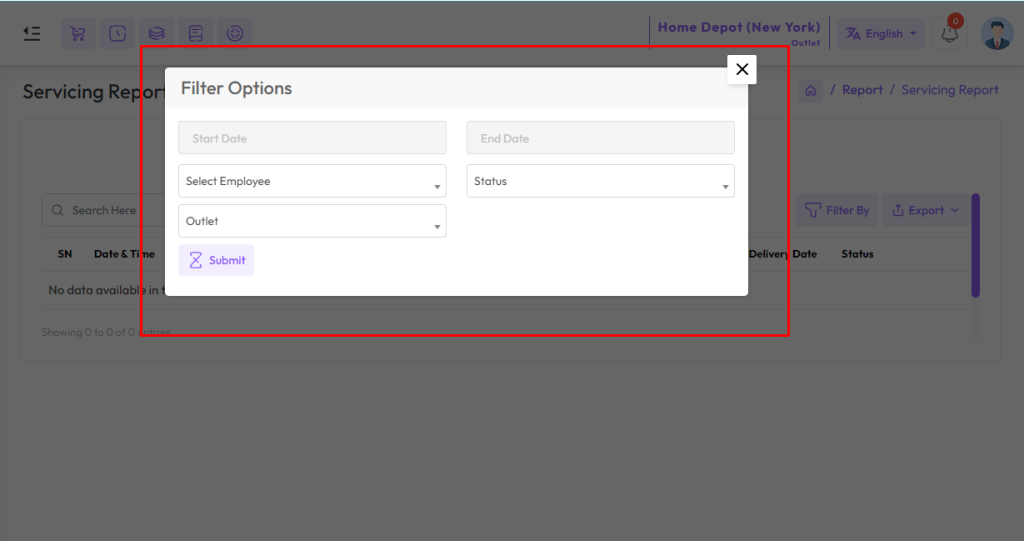
To view the “Servicing Report” expand the “Report” menu from the left sidebar and click on the “Servicing Report” menu.
Select a date to view the report within a specified date if needed. select a employee if needed, select status if needed, also you can select outlet from the outlet field to filter report according to outlet.